
If you know me, you know that the Tyrannosaurus rex is my absolute favorite dinosaur and possibly my favorite animal. It took me years to finally design a T-Rex pattern I was proud of, and this is it! I hope you enjoy this free T-Rex dinosaur amigurumi pattern I poured my heart and soul into.

Meet Troy, the T-Rex! Troy may look fierce, but he’s actually incredibly gentle and sweet. He loves pets and cuddles; if you didn’t know better, you’d think he was just a big puppy!
Want more dinosaur amigurumi patterns? Be sure to check out the FREE patterns for Trixie the Triceratops and Sammy the Stegosaurus!

You can purchase a printable, ad-free, beautifully formatted, concise version of this free T-Rex dinosaur amigurumi pattern in my shop HERE. Otherwise, please keep scrolling down for the free version!
Disclaimer: Some links in this free T-Rex dinosaur amigurumi pattern may be affiliate links. Affiliate links are a way for me to make a small commission on certain products at no extra cost to you!
Materials You Need to Make This Free T-rex Dinosaur Amigurumi Pattern
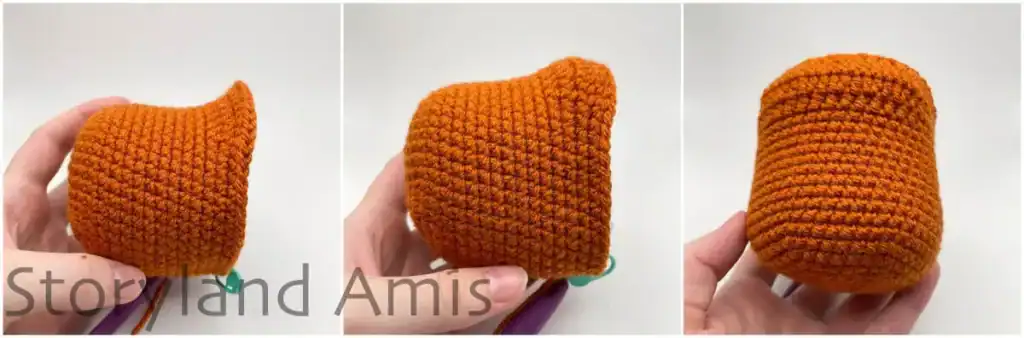
- Worsted-weight yarn (4-ply) in any color plus a small amount of black and white for the mouth and claws. (The U.K. equivalent is Aran, and AUS/NZ is 8 ply.) For the orange t-rex in the step-by-step photos, I used Hobby Lobby’s I Love This Yarn in the color “Burnt Pumpkin,” and for the green t-rex, I used the same brand in the color “Mid Green“.
- G (4 mm) crochet hook
- 15 mm black safety eyes
- Fiberfill (or your stuffing of choice)
- Bent tip tapestry needle
- Scissors
- Stitch marker
- Straight pins
Abbreviation Key
Abbreviations are in U.S. terms.
- sc – single crochet
- st/sts – stitch(es)
- sl st – slip stitch
- dec – decrease (join the next 2 stitches together)
- inc – increase (2 single crochet in the next stitch)
- hdc – half double crochet
- hdc dec – half double crochet decrease
- BLO – back loops only
- R1 – round 1
- rep – repeat
- ** – repeat the group of instructions between the asterisks the number of times indicated.
Note: All rounds are worked continuously (that is, vs. joined rounds.)
The finished size is approximately 6 in. (15 cm.) tall. (Please be aware that your personal gauge, tension, hook size, and the brand of yarn you decide to use will all impact the finished size.)
The pattern and images in this document are the sole property of Storyland Amis. This written pattern is for personal use only. Please do not share, sell, or redistribute it in whole or part.
You MAY sell the finished product, but please credit Storyland Amis as the designer. If you sell your finished items online, I would appreciate it if you could link them to my blog! You may not mass-produce items made from this pattern. Thank you for your understanding and respect.
Important Additional Info
Starting round: When starting my crochet pieces in the round, I always use the “ch 2 method.” That is perfectly fine if you prefer to start your pieces using the magic circle/ring instead. These two methods are interchangeable, and the end result will be the same regardless of your choice. Watch this short video to learn how to make the “ch 2 method”.
Right vs. wrong side: When working in the round, I always crochet with the “right” side of the stitches facing out. Watch my short video to see the difference between the “right” and “wrong” side of crochet stitches.
Yarn under vs. yarn over: I always yarn under (YU) instead of yarn over (YO) for all my amigurumi. Doing YO might make your amigurumi slightly larger than mine, so keep that in mind if you prefer YO. Watch my video on the differences between yarn under and yarn over.
Sewing pieces together: I sew all my pieces together using the whipstitch unless otherwise specified.
Stuffing: Check out my short video on how to stuff pieces properly here.
Color changes: Insert hook into last st of round or section with old color, yarn over & pull hook through st. Take your new color of yarn, yarn over & pull hook through remaining 2 loops on hook. Now you’re ready to start the new round or section. Check out my video on color changes here.
Free T-Rex Dinosaur Amigurumi Pattern (Pin me for Later!)

Eye piece (make 2)
Ch 6, starting in 2nd ch from hook, make 1 sc in each of the next 5 chs, now rotate your work 180 degrees and work in the front loops of the ch, starting in the first ch, inc, sc 3, inc (12 sts)
This is called starting your work with a foundation chain and is a great way to start a piece you want to be more oval than round. After crocheting through the top loops of the chain, you turn your work upside down so that the sts you just crocheted are at the bottom and the front/bottom loops of the chain are now at the top. These are the sts you will now work into. Once you’re at the end of the row, the first round is complete! Now you just continue as you normally would working in the round. Watch this video to learn how to crochet into a foundation chain.


Leaving a long tail for sewing, finish off neatly using the invisible finish technique. Set aside until we have made the head.

Head
R1: ch 2, starting in the 2nd ch from hook, sc 6 (6 sts) (you can use the magic circle if you prefer as it won’t make a difference in the end. In that case, you will make a magic circle and make 6 sc in the magic circle. Watch this video to see how to start crocheting in the round using the “ch 2 method”.)
R2: *inc* rep 6 times (12 sts)
R3: *sc 1, inc* rep 6 times (18 sts)
R4: *sc 2, inc* rep 6 times (24 sts)
R5: *sc 3, inc* rep 6 times (30 sts)
R6: *sc 4, inc* rep 6 times (36 sts)
R7: *sc 5, inc* rep 6 times (42 sts)
R8: *sc 6, inc* rep 6 times (48 sts)
R9-19: sc in all 48 sts (11 rounds total at 48 sts each)
R20: sc 17, hdc 14, sc 17 (48 sts)
R21: sc 17, hdc 1, *hdc 1, hdc inc* rep 6 times, hdc 1, sc 17 (54 sts)
R22: sc 17, hdc 20, sc 17 (54 sts) (Place a marker on this round as we will use it to position the eyes later)

R23: sc 17, hdc 1, *hdc 1, hdc dec* rep 6 times, hdc 1, sc 17 (48 sts)
R24-25: sc in all 48 sts (2 rounds total at 48 sts each)
R26: *sc 6, dec* rep 6 times (42 sts)
Positioning the Eyes
We will now place the safety eyes but do NOT secure them in place with the washer until we have sewn the eye pieces on. Insert your 15mm safety eyes between R21 & 22, 28 sts apart. To do this, insert your first eye 4 sts below the first hdc st on R22.

Count 28 sts from the hole where you inserted the 1st eye and insert the 2nd eye. The 2nd eye should also be 4 sts below the last hdc st from R22. To avoid confusion with the increases from R21, count the 28 sts between the eyes on R22 of the head, not R21. Again, do NOT secure the eyes with the washers yet.


Get 24 patterns in this exclusive bundle!
For less than $15, you can get every Christmas pattern I’ve ever designed! Plus FREE access to any future Christmas designs for life.
Embroidering the Mouth
To embroider the mouth, take a long piece of sport weight/DK weight black yarn. If you don’t have sport weight/DK weight yarn then split a piece of worsted weight/Aran weight yarn in two to create a thinner strand. Knot the end of the yarn and pull your yarn and needle through R14 & 15 of the head.
You’re going to make a small, vertical stitch one stitch tall between R14 & 15 of the head to start (see 1st image in the collage below). The top of the stitch should be approx. parallel to the bottom of the safety eye (see 2nd image in the collage below).
Now pull the yarn all the way across the front of the head/snout to the opposite side and pull your needle through R14 & 15 of the head (see last 2 images in the collage below). You now have one long stitch over the snout.

Like we did on the opposite side of the head, make a small, vertical stitch one stitch tall between R14 & 15 of the head (see 1st image in the collage below). This stitch should also be approx. parallel to the bottom of the safety eye (see 2nd image in the collage below).

Securing the Mouth
Now we will secure the mouth over the front of the snout. First adjust the yarn so that it’s shaped to your liking. I positioned the bottom of my mouth so that it dipped down between R5 & 6 of the head (see 3rd image in the above collage). To make sure that my mouth stayed straight and even all the way across, I first pinned it in place using straight pins and removed them as I added the stitches to secure it.

Be careful not to poke yourself while you’re sewing! To secure the mouth in place we will make small vertical stitches over the mouth to secure it in place. I spaced each stitch about ½ inch (1.5 cm) apart, but you can space yours as close together or far apart as you like.

Keep checking periodically as you stitch it down to make sure everything is even. Once you reach the end of the mouth, make a knot on the inside of the head to secure the sewing.
Embroidering the Teeth
For the teeth you will take a long strand of white yarn (again, sport/DK weight or worsted weight yarn split in two to make it thinner). To embroider the teeth we will be following the bottom line of the mouth. You will want to make small triangle shaped teeth all the way across the mouth using straight stitches. When finished, make a knot on the inside of the head to secure the sewing.


Sewing the Eye Pieces on
Now we will sew the eye pieces on that we made previously. To do this, place the eye piece over the top of the safety eye. You can play around with the position of the eye piece but I placed mine so that slightly more of the eye piece was toward the back of the eye than the front.

Start by pulling your yarn tail and needle through the corner stitch of the eye piece and through the stitches on the head right below that stitch. Now bring your yarn and needle up through the head and through the next stitch on the eye piece. Then bring your yarn and needle down through the next stitch on the eye piece and the head. Repeat this process until the top edge of the eye piece is sewn on.

You’ll stop sewing when you reach the starting tail from the eye piece.

When finished, weave the sewing tail and the starting tail from the head piece to the inside of the head and knot them together to secure the sewing.

Repeat these steps for the other eye (see pics. #20 & #21). When finished, secure the safety eyes with the washers.


Finishing the Head
R27: *sc 5, dec* rep 6 times (36 sts)
Start to stuff the head, continuing to stuff as you close the head up. See “stuffing” under the “Important Additional Info” section at the beginning of this post for tips on how to stuff large heads.
R28: *sc 4, dec* rep 6 times (30 sts)
R29: *sc 3, dec* rep 6 times (24 sts)
R30: *sc 2, dec* rep 6 times (18 sts)
R31: *sc 1, dec* rep 6 times (12 sts)
R32: *dec* rep 6 times (6 sts)
Finish off leaving a tail. Using the tail we left and your tapestry needle, neatly sew the hole closed. Set the head aside until we make the body.


Body
R1: ch 2, starting in the 2nd ch from hook, sc 6 (6 sts)
R2: *inc* rep 6 times (12 sts)
R3: *sc 1, inc* rep 6 times (18 sts)
R4: *sc 2, inc* rep 6 times (24 sts)
R5: *sc 3, inc* rep 6 times (30 sts)
R6: *sc 4, inc* rep 6 times (36 sts)
R7-10: sc in all 36 sts (4 rounds total at 36 sts each)
R11: *sc 4, dec* rep 6 times (30 sts)
R12-17: sc in all 30 sts (6 rounds total at 30 sts each)
R18: hdc 11, sl st 8, hdc 11 (30 sts)

Finish off leaving a long tail for sewing. Stuff body firmly.


Position the body so that it’s over R15-26 of the head with the 8 sl sts from R18 at the front of the snout and the hdc sts at the back and sides. The front of the body should be on R15 of the head and the back of the body should stretch to R26 of the head. When you are satisfied with the placement, pin the body into place with straight pins to keep it from shifting around while you are sewing it on.

Using your long tail and tapestry needle, sew the body to the head using the whipstitch. Make sure to check the position of the body occasionally while you’re sewing it on to make sure it’s still positioned correctly over the head. About two-thirds of the way around sewing, you might want to add a little more stuffing to the neck to make it sturdier.

When finished sewing, make a knot to secure and weave the remaining tail into the head to finish.

Legs (make 2)
R1: ch 5, starting in the 2nd ch from hook, inc, sc 2, inc, now rotate your work 180 degrees and work in the front loops of the ch, starting in the first front loop, inc, sc 2, inc (12 sts)
This is called starting your work with a foundation chain and is a great way to start a piece you want to be more oval than round. After crocheting through the top loops of the chain, you turn your work upside down so that the sts you just crocheted are at the bottom and the front or bottom loops of the chain are now at the top. These are the sts you will now work into. Once you’re at the end of the row, the first round is complete! Now you just continue as you normally would working in the round. Watch this video to learn how to crochet into a foundation chain.


R2: *sc 1, inc* rep 6 times (18 sts)
R3: in BLO sc in all 18 sts (18 sts) (This is the only round we will crochet in the BLO.)


R4: sc in all 18 sts (18 sts)
R5: sc 6, dec 3, sc 6 (15 sts)
R6: sc 5, dec 3, sc 4 (12 sts)
R7: *sc 1, dec* rep 4 times (8 sts)

R8: sc in all 8 sts (8 sts)
R9: *sc 1, inc* rep 4 times (12 sts)
Stop and stuff the foot firmly. We will not stuff the rest of the leg, just the foot.
R10: *sc 1, inc* rep 6 times (18 sts)

R11-13: sc in all 18 sts (3 rounds total at 18 sts each)
R14: *sc 1, dec* rep 6 times (12 sts)
R15: *dec* rep 6 times (6 sts)
Finish off leaving a long tail for sewing. We won’t add anymore stuffing. Using the tail we left and your tapestry needle, neatly sew the hole closed.
Embroidering the Toes
To make his toenails, thread your tapestry needle with some white yarn. We will embroider three toenails over R3 and 4 of the foot. The toenails should be centered over the top of the foot and each toenail should be spaced about 2 stitches apart from each other. Start with the center toenail to make things easier and then add the other two on either side of the center one. Use the photos below as a guide on how to embroider them.


When you are finished, weave the sewing tail over to the starting tail and knot the two ends together. Weave the remaining tails into the foot to finish.

Now, flatten the thighs.

Weave the finishing tail down to the bottom side of the thigh and bring it through R10 & 11 approx. We’ll use this tail later to sew the legs to the body. Set the legs aside until we have made the tail.

Tail
R1: ch 2, starting in 2nd ch from hook, sc 4 (4 sts)
R2: inc, sc 2, inc (6 sts)
R3: inc, sc 4, inc (8 sts)
R4: inc, sc 6, inc (10 sts)
R5: inc, sc 8, inc (12 sts)
R6: inc, sc 10, inc (14 sts)
R7: inc, sc 12, inc (16 sts)
R8: inc, sc 14, inc (18 sts)
R9: inc, sc 16, inc (20 sts)
R10: inc, sc 18, inc (22 sts)
R11: inc, sc 20, inc (24 sts)
R12: inc, sc 22, inc (26 sts)
R13: inc, sc 24, inc (28 sts)
Finish off leaving a long tail for sewing. Stuff the tip of the tail firmly. We’ll add more stuffing to the tail as we sew it to the body to make it nice and firm.

Sewing the Tail to the Body
Position the tail over the back of the body so that it stretches over R3-15 of the body approx. and pin it into place using straight pins to keep it in place. We want the tail pretty far down on the body so that it stabilizes your t-rex so he can sit on his own without falling over. To make sure that this happens, we will also position the legs to the body before sewing the tail on to make sure the tail is in the correct position and he can sit on his own.

Position the legs over R5-11 of the body with the back edges of the legs right up against the edge of the tail and pin them in place using straight pins. Now, place your t-rex on a flat surface to see if he can sit on his own without falling over. You may need to move the legs or tail further up or down to achieve this, so experiment until he’s able to sit on his own. You will now remove the legs, being careful to leave the tail in the same position, so we can sew the tail on.


Using the whipstitch, sew the tail to the body.


When you have sewn about 2/3 of the tail on, add some more stuffing to the tail and continue to stuff the tail as you finish sewing it on until it’s firmly stuffed.

When you are finished, make a knot to secure the sewing and weave the remaining tail into the body to finish.

Sewing the Legs to the Body
Now reposition the legs to the body (setting him on a flat surface once again to ensure he can sit on his own), and pin them into place using straight pins (refer back to the pictures where we originally positioned the legs). To sew them on, start at the bottom edge of the thigh where the tail is (see first image in the below collage photo). Using the whipstitch, sew all the way around the bottom edge, back edge, and top edge of the thigh.

When you are finished, make a knot to secure the sewing and weave the remaining tail into the body. Repeat for the other leg.


Arms (make 2)
R1: ch 2, starting in 2nd ch from hook, sc 6 (6 sts)
R2-5: sc in all 6 sts (4 rounds total at 6 sts each)
Now we will make the claws
R6: make 1 sl st in the first st, ch 4, starting in the 2nd ch from hook, make 1 sl st in each of the 3 ch sts, make 1 sl st in the 2nd st, ch 4, starting in the 2nd ch from hook, make 1 sl st in each of the 3 ch sts, make 1 sl st in the 3rd st.


Finish off leaving a long tail for sewing.

Sewing the Arms to the Body
Weave the finishing tail to the back of the arm between R4 & 5.

Position the arms over R14-17 of the body with the claws parallel to the edge of the foot.


Starting where the sewing tail is at the back of the arm, sew around the bottom edge of the arm and around the back of the arm until you reach the middle of the top edge. Weave the remaining tail to the back of the body and leave it there without cutting it until we have sewn the other arm on.

Once you have the other arm sewn on, weave that remaining tail to the back of the body and out through the same stitch as the tail from the first arm. Knot the two tails together and then weave the two tails back into the body to hide the knot.


Congratulations—you’re done! I hope you enjoyed making this free T-Rex dinosaur amigurumi pattern. I would love to see pictures of your finished project!


If you make this free T-Rex dinosaur amigurumi pattern, share your creations with me via social media or email me directly! You can find me on Instagram (@storyland_amis) and Facebook (Storyland Amis).
Please feel free to leave a comment below, letting me know if you enjoyed this free T-Rex dinosaur amigurumi pattern or have any questions!
Thanks for stopping by! Until next time, then – stay crafty!
Get 24 patterns in this exclusive bundle!
For less than $15, you can get every Christmas pattern I’ve ever designed! Plus FREE access to any future Christmas designs for life.
this is an awesome awesome beautiful pattern! however, my skills are not really such that I could get things sewn together really well but I really admire what you’ve done! I think I’m going to have to look for some of those quote unquote Nosew amiguramis. but this one is much more better looking and I love the head and I love the tail great job
Hi Sandie! Thank you so much for your kind words! I’m glad you like this pattern. I’m sure that once you get some more practice with the easier patterns you can come back to this one with no problem! 🙂
Thank you so much for this pattern. Very easy to follow and the dinosaur looks absolutely fantastic! I also made your shark- super cute. I have a very happy nephew and I had great fun making these two 😉
Good afternoon! For some reason, I can’t get the shape of my head to match yours. My head is straight, without the curve you have.
Hey! Did you make sure to do the hdc stitches and decreases from R20 to R23? That is how I got the curve on the top of my head. 🙂
This pattern is extremely well written! The step by step photos are SUPER helpful! I will look tonthis site for future patterns!,,,,
I’m so happy to hear that! Thank you for your support!! 🙂
Your pattern was super easy to follow and my nephew and I loved the design. Thanks for sharing it. <3
Aww, I’m glad to hear that! Thank you!