
Last Updated on March 13, 2026 by Holly Lanier
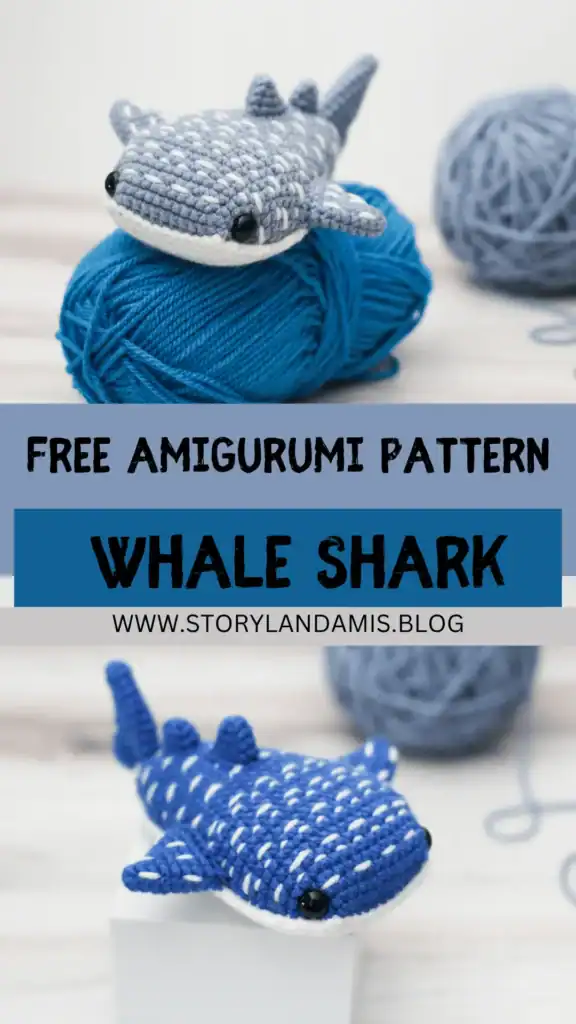
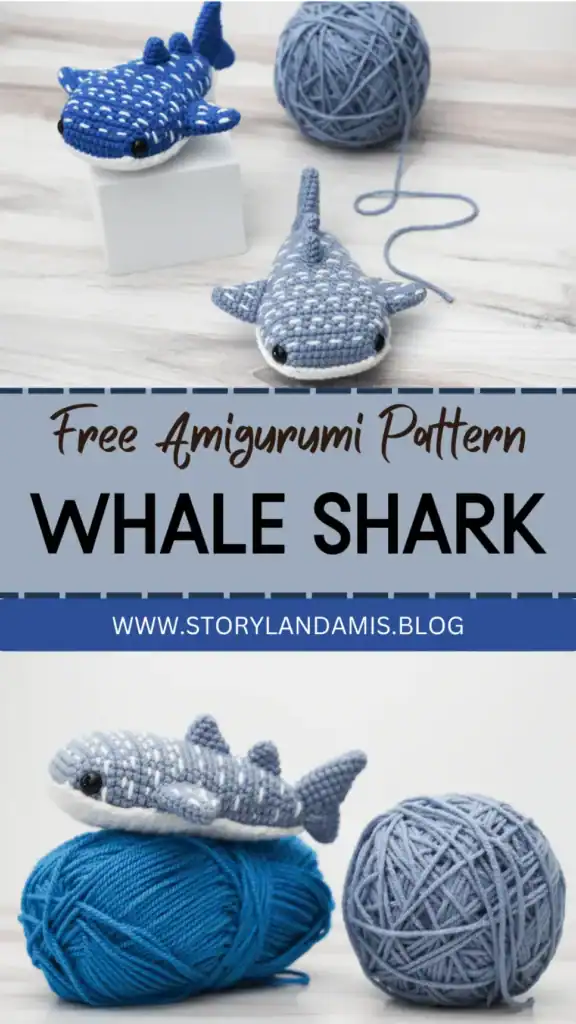
I’m so excited to share this easy, beginner-friendly, FREE whale shark amigurumi pattern with you today! When I first designed Jonah, I had no idea how popular and well-loved he would be. His pattern has amassed hundreds of positive reviews and dozens of social media posts showing the finished product. I hope this pattern can continue to bring joy and relaxing crochet time to many more people!
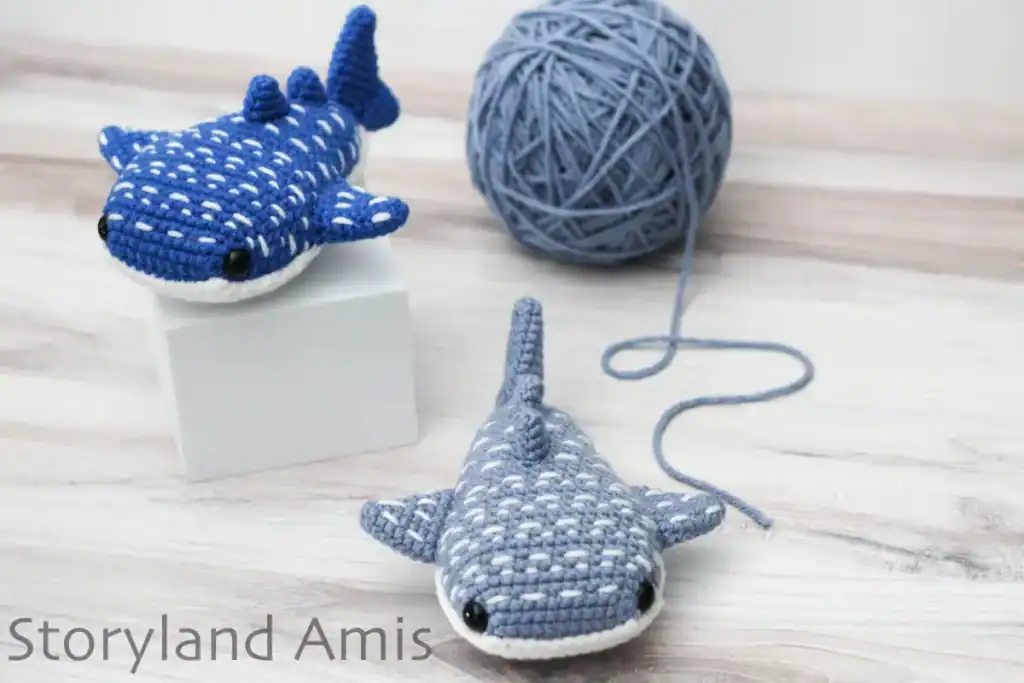
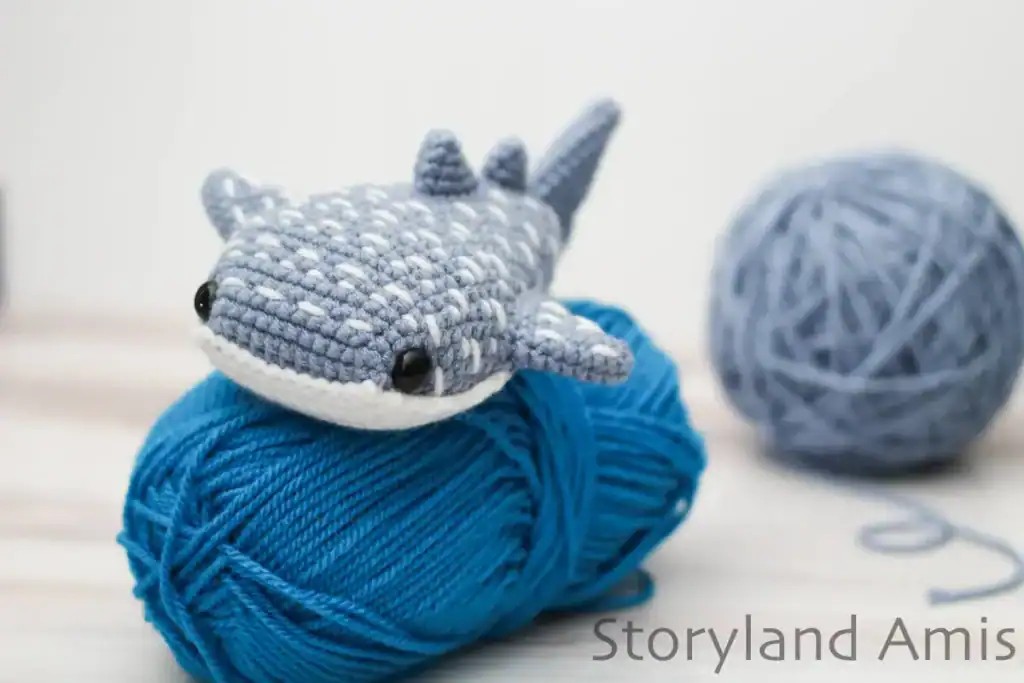
Meet Jonah the Whale Shark! Being the world’s largest fish can sometimes feel like a big responsibility but Jonah finds that going for a long, slow swim helps him relax. Jonah just keeps smiling no matter what and he’s always the first to lift up and encourage a friend.
Want more FREE sea creature amigurumi patterns? Check out my FREE Snorkel the Seahorse Amigurumi Pattern and my FREE Mochi the Jellyfish Amigurumi Pattern!
You can purchase a printable, ad-free, beautifully formatted, concise version of this whale shark amigurumi pattern in my shop HERE. Otherwise, please keep scrolling down for the free version!
Disclaimer: Some links in this free whale shark amigurumi pattern may be affiliate links. Affiliate links are a way for me to make a small commission on certain products at no extra cost to you!
Materials You Need to Make This Free Whale Shark Amigurumi
- Worsted-weight yarn (4-ply) in blue and white. (The U.K. equivalent is Aran, and AUS/NZ is 8 ply.) For my whale shark, I used Hobby Lobby’s I Love This Yarn in the colors “Stonewash” and “White“.
- G (4 mm) crochet hook
- 12 mm black safety eyes
- Fiberfill (or your stuffing of choice)
- Bent tip tapestry needle
- Scissors
- Stitch marker
- Straight pins
Abbreviation Key
Abbreviations are in U.S. terms.
- sc – single crochet
- st/sts – stitch(es)
- sl st – slip stitch
- dec – decrease (join the next 2 stitches together)
- inc – increase (2 single crochet in the next stitch)
- R1 – round 1
- rep – repeat
- ** – repeat the group of instructions between the asterisks the number of times indicated.
Note: All rounds are worked continuously (that is, vs. joined rounds.)
The finished size is approximately 7 in. (18 cm.) long. (Please be aware that your personal gauge, tension, hook size, and the brand of yarn you decide to use will all impact the finished size.)
The pattern and images in this document are the sole property of Storyland Amis. This written pattern is for personal use only. Please do not share, sell, or redistribute it in whole or part.
You MAY sell the finished product, but please credit Storyland Amis as the designer. If you sell your finished items online, I would appreciate it if you could link them to my blog! You may not mass-produce items made from this pattern. Thank you for your understanding and respect.
Important Additional Info
Starting round: When starting my crochet pieces in the round, I always use the “ch 2 method.” That is perfectly fine if you prefer to start your pieces using the magic circle/ring instead. These two methods are interchangeable, and the end result will be the same regardless of your choice. Watch this short video to learn how to start with the “ch 2 method”.
Right vs. wrong side: When working in the round, I always crochet with the “right” side of the stitches facing out. Watch my short video to see the difference between the “right” and “wrong” side of crochet stitches.
Yarn under vs. yarn over: I always yarn under (YU) instead of yarn over (YO) for all my amigurumi. Doing YO might make your amigurumi slightly larger than mine, so keep that in mind if you prefer YO. Watch my video on the differences between yarn under and yarn over.
Sewing pieces together: I sew all my pieces together using the whipstitch unless otherwise specified.
Stuffing: Check out my short video on how to stuff pieces properly here.
Color changes: Insert hook into last st of round or section with old color, yarn over & pull hook through st. Take your new color of yarn, yarn over & pull hook through remaining 2 loops on hook. Now you’re ready to start the new round or section. Check out my video on color changes here.
Free Whale Shark Amigurumi Pattern
Body (using bluish gray yarn)
For help with the first two rounds of the body, please watch this video HERE.
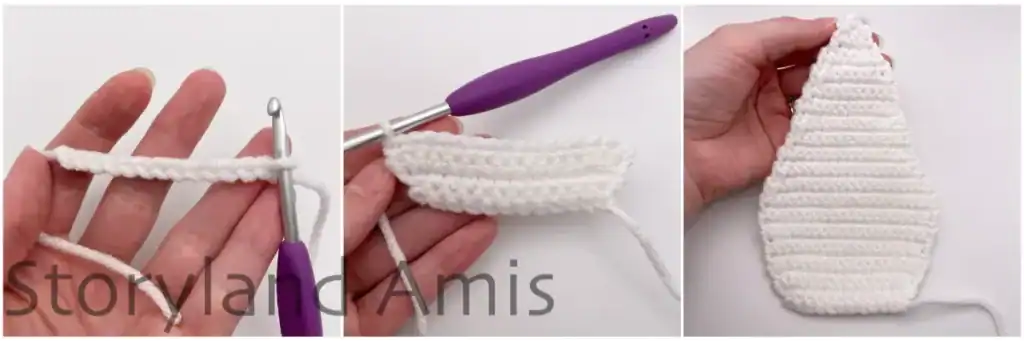
R1: ch 13, starting in 2nd ch from hook, sc 12, now rotate your work 180 degrees and work in the front loops of the ch, starting in the first front loop, sc 12 (24 sts)
(See pic. #1). This is called starting your work with a foundation chain and is a great way to start a piece you want to be more oval than round. After crocheting through the top loops of the chain, you turn your work upside down so that the sts you just crocheted are at the bottom and the front/bottom loops of the chain are now at the top. These are the sts you will now work into. Once you’re at the end of the row, the first round is complete! Now you just continue as you normally would working in the round. Watch this video to learn how to crochet into a foundation chain.
R2: inc, sc 9, inc 3, sc 9, inc 2 (30 sts)
R3: sc in all 30 sts (30 sts)
R4: sc 1, inc, sc 9, *sc 1, inc* rep 3 times, sc 9, *sc 1, inc* rep 2 times (36 sts)
R5: sc in all 36 sts (36 sts)
R6: sc 2, inc, sc 9, *sc 2, inc* rep 3 times, sc 9, *sc 2, inc* rep 2 times (42 sts)
R7-14: sc in all 42 sts (8 rounds total at 42 sts each)
Adding the Eyes
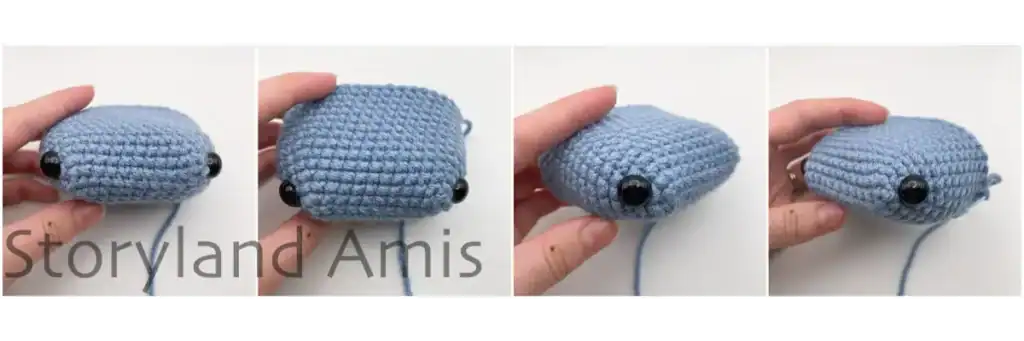
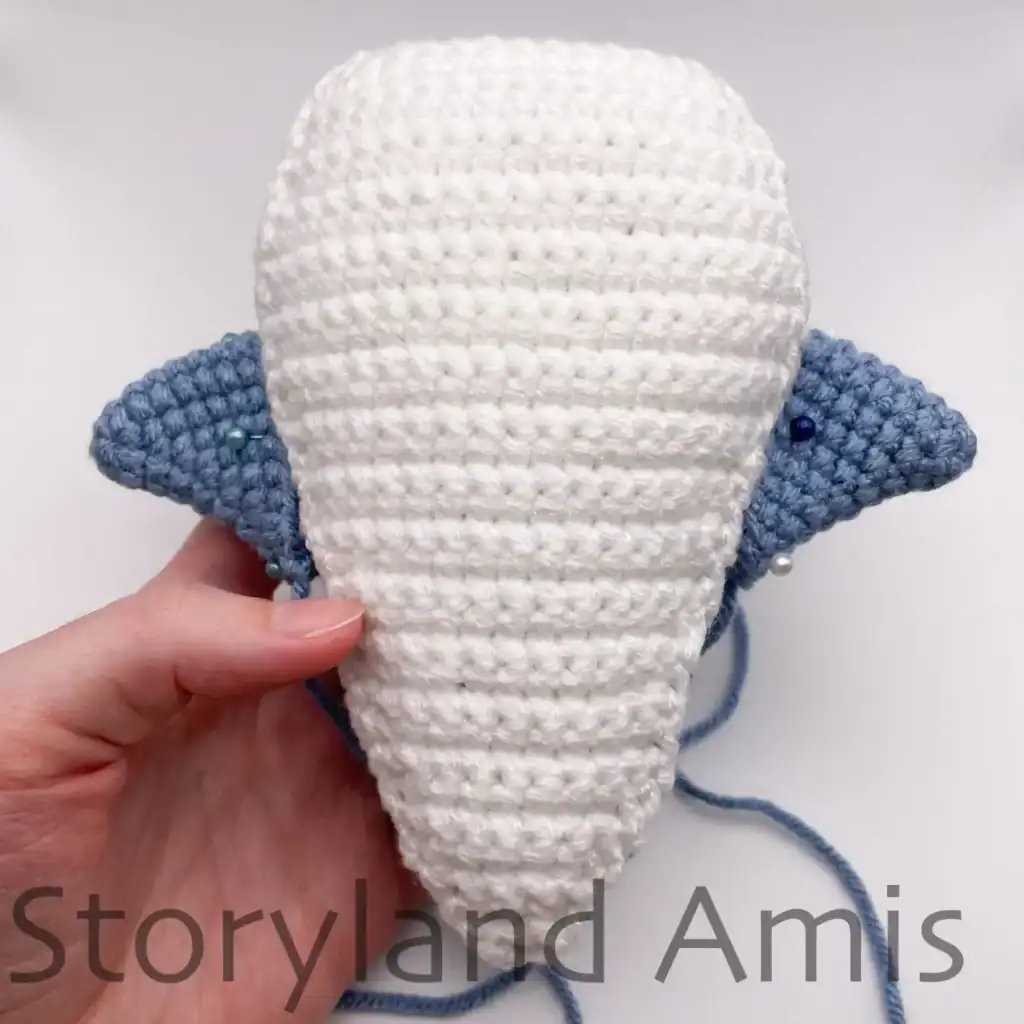
Stop and insert your 12mm safety eyes between R3 & 4 of the head, 14 sts apart (Hint: insert the 1st eye. Count 14 sts from the hole where you inserted the 1st eye and insert the 2nd eye. See pic. #2.)
R15: dec, sc 19, dec, sc 19 (40 sts)
R16: dec, sc 18, dec, sc 18 (38 sts)
R17: sc in all 38 sts (38 sts)
R18: dec, sc 17, dec, sc 17 (36 sts)
R19: sc in all 36 sts (36 sts)
R20: dec, sc 16, dec, sc 16 (34 sts)
R21: sc in all 34 sts (34 sts)
R22: dec, sc 15, dec, sc 15 (32 sts)
R23: dec, sc 14, dec, sc 14 (30 sts)
R24: sc in all 30 sts (30 sts)
R25: dec, sc 13, dec, sc 13 (28 sts)
R26: sc in all 28 sts (28 sts)
R27: dec, sc 12, dec, sc 12 (26 sts)
R28: sc in all 26 sts (26 sts)
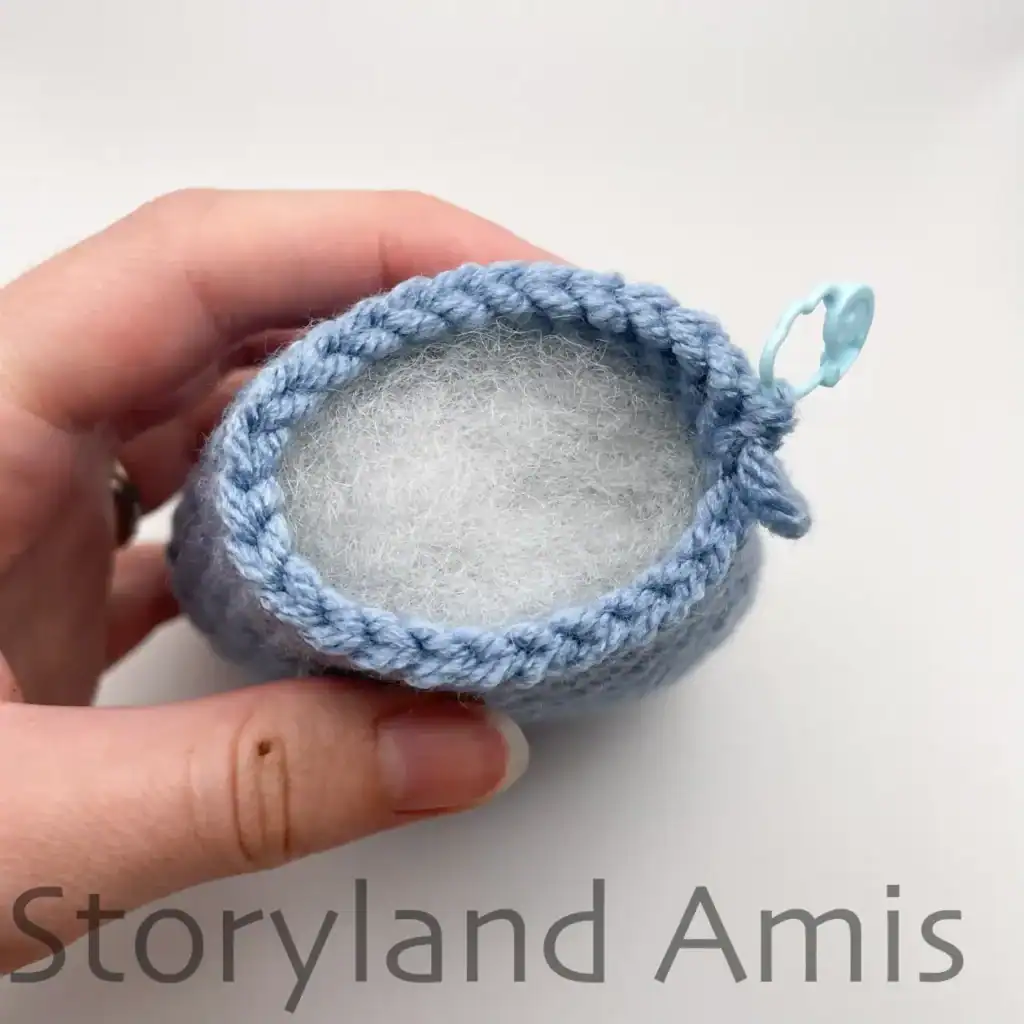
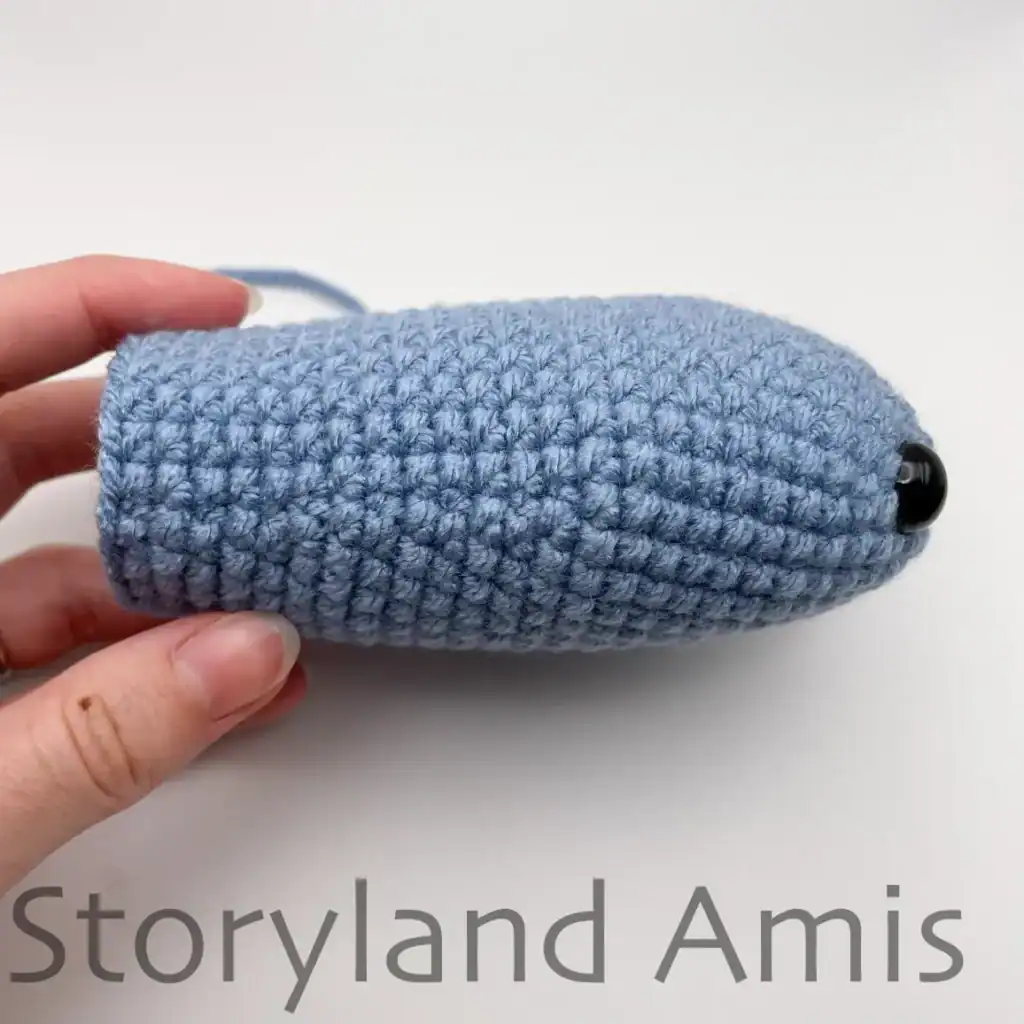
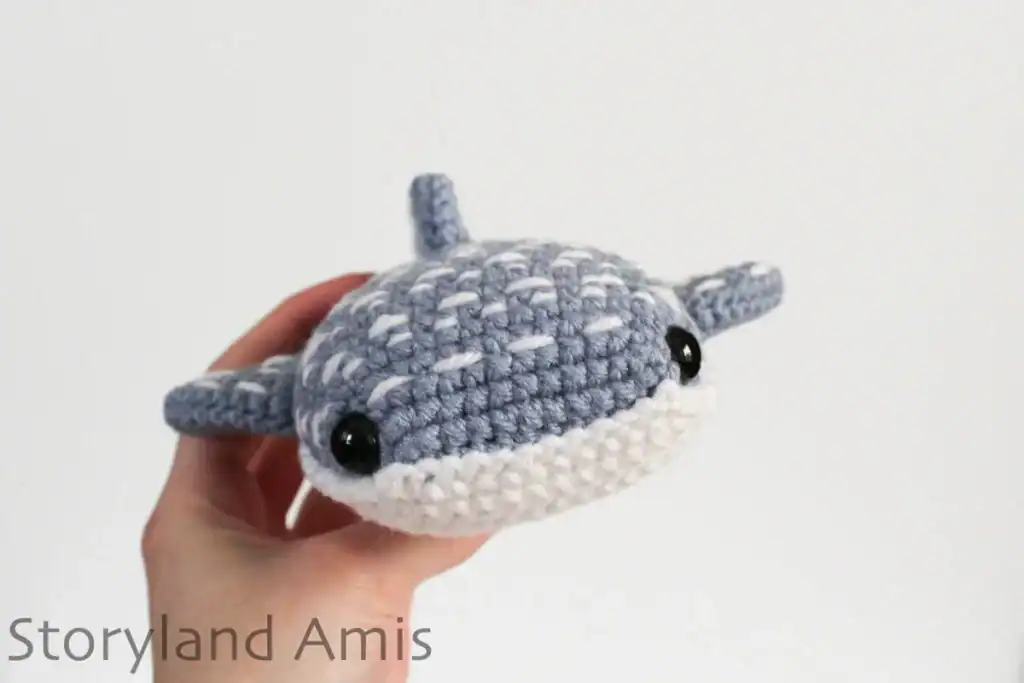
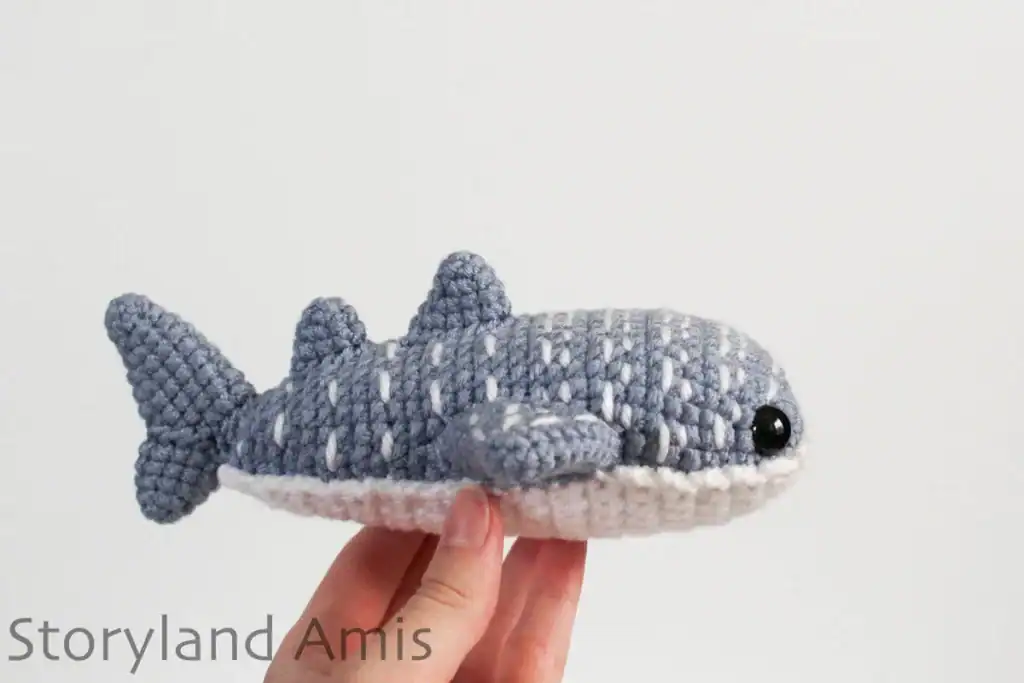
Stop and begin to stuff the body (see pic. #3). Do not stuff too firmly as we want our whale shark to maintain a somewhat flat shape as seen in pic. #4. Continue stuffing as you work.
R29: dec, sc 11, dec, sc 11 (24 sts)
R30: *sc 2, dec* rep 6 times (18 sts)
R31: sc in all 18 sts (18 sts)
R32: *sc 1, dec* rep 6 times (12 sts)
R33: sc in all 12 sts (12 sts)
R34: *dec* rep 6 times (6 sts)
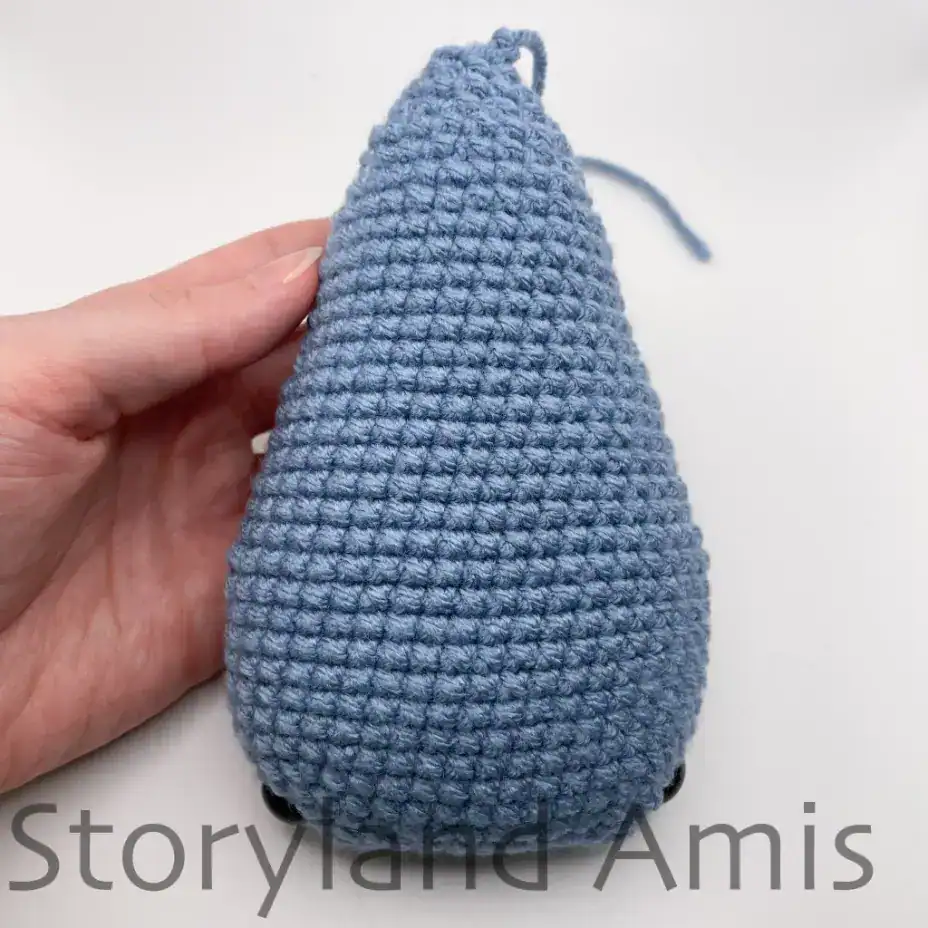
Finish off leaving a tail for sewing (see pic. #5). Neatly sew the hole closed. Watch this video to learn how to neatly sew a hole closed.
Belly (using white yarn)
Belly is worked entirely in rows rather than rounds (see pic. #6)
R1: ch 13, starting in 2nd ch from hook, sc 12, ch 1, turn
R2: inc, sc 10, inc (14 sts) ch 1, turn
R3: sc 1, inc, sc 10, inc, sc 1 (16 sts) ch 1, turn
R4: sc in all 16 sts (16 sts) ch 1, turn
R5: inc, sc 14, inc (18 sts) ch 1, turn
R6-8: sc in all 18 sts (3 rows total at 18 sts each) ch 1, turn
R9: inc, sc 16, inc (20 sts) ch 1, turn
R10-14: sc in all 20 sts (5 rows total at 20 sts each) ch 1, turn
R15: dec, sc 16, dec (18 sts) ch 1, turn
R16: sc in all 18 sts (18 sts) ch 1, turn
R17: dec, sc 14, dec (16 sts) ch 1, turn
R18-19: sc in all 16 sts (2 rows total at 16 sts each) ch 1, turn
R20: dec, sc 12, dec (14 sts) ch 1, turn
R21-22: sc in all 14 sts (2 rows total at 14 sts each) ch 1, turn
R23: dec, sc 10, dec (12 sts) ch 1, turn
R24-25: sc in all 12 sts (2 rows total at 12 sts each) ch 1, turn
R26: dec, sc 8, dec (10 sts) ch 1, turn
R27-28: sc in all 10 sts (2 rows total at 10 sts each) ch 1, turn
R29: dec, sc 6, dec (8 sts) ch 1, turn
R30: sc in all 8 sts (8 sts) ch 1, turn
R31: dec, sc 4, dec (6 sts) ch 1, turn
R32: dec, sc 2, dec (4 sts) ch 1, turn
R33: sc in all 4 sts (4 sts) ch 1, turn
R34: *dec* rep 2 times (2 sts)
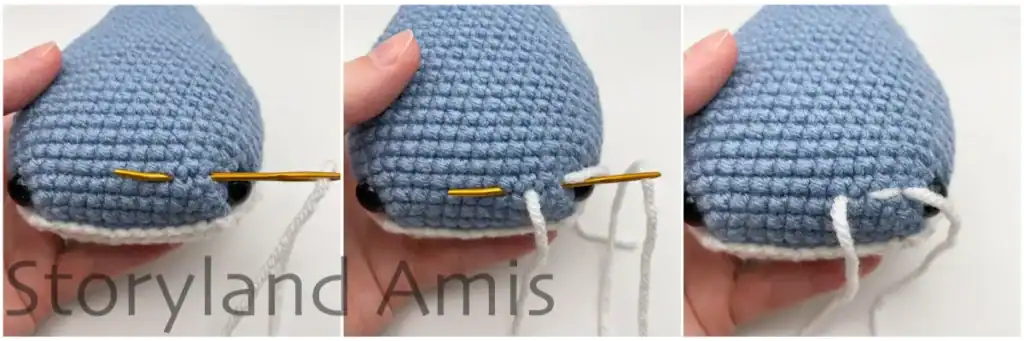
Sewing the Belly to the Body
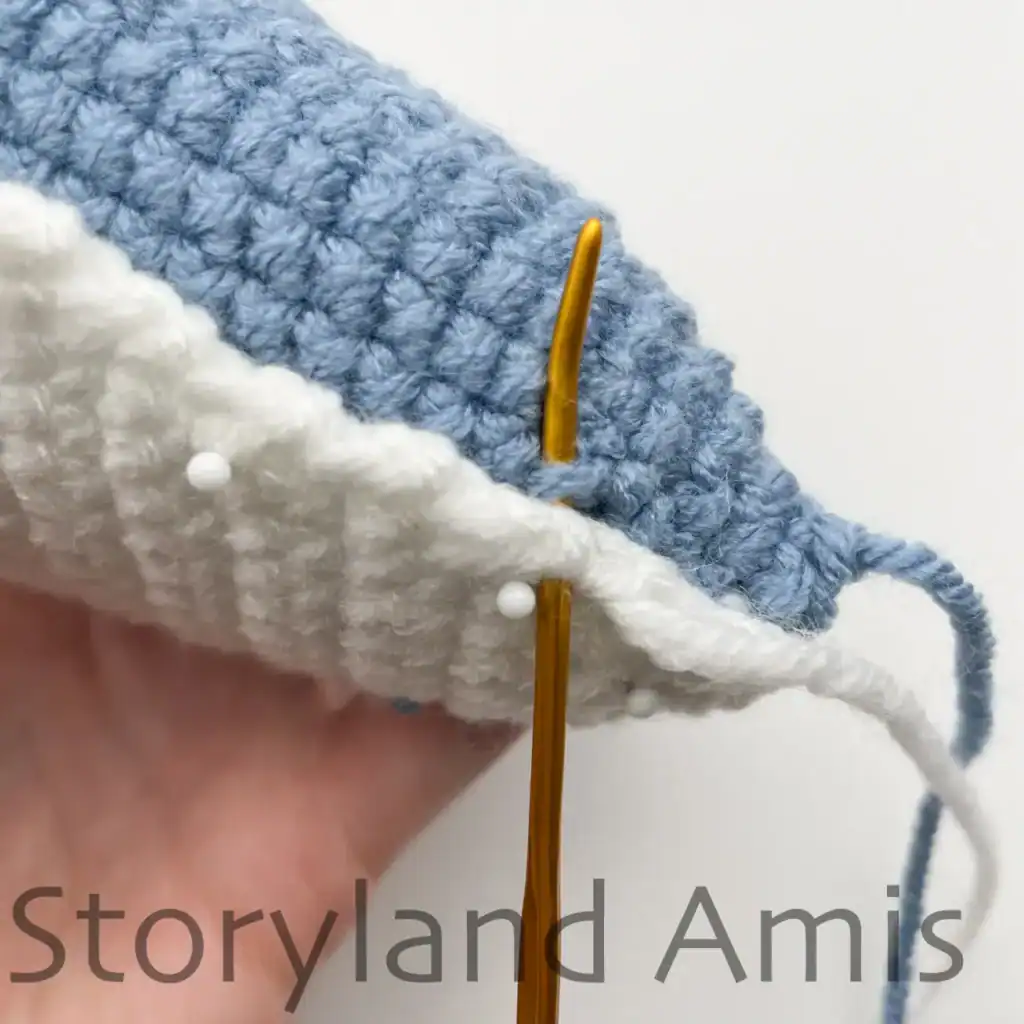
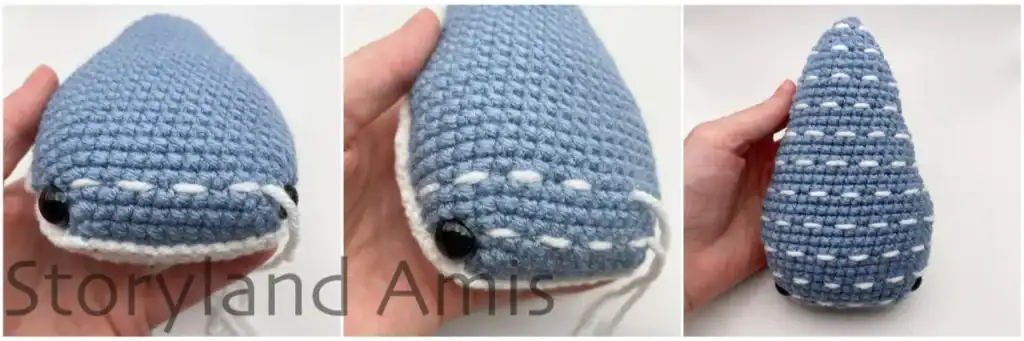
Finish off leaving a long yarn tail for sewing. Place the belly piece on the bottom of your whale shark and use straight pins to make sure it stays in place while you are sewing it on (see pic. #8).
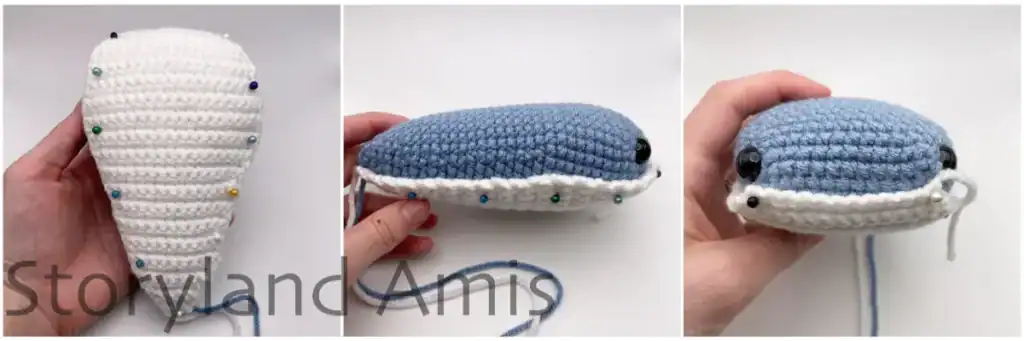
Sew all the way around the outer edge of the belly piece to the whale shark body (see pics. #9 and #10).
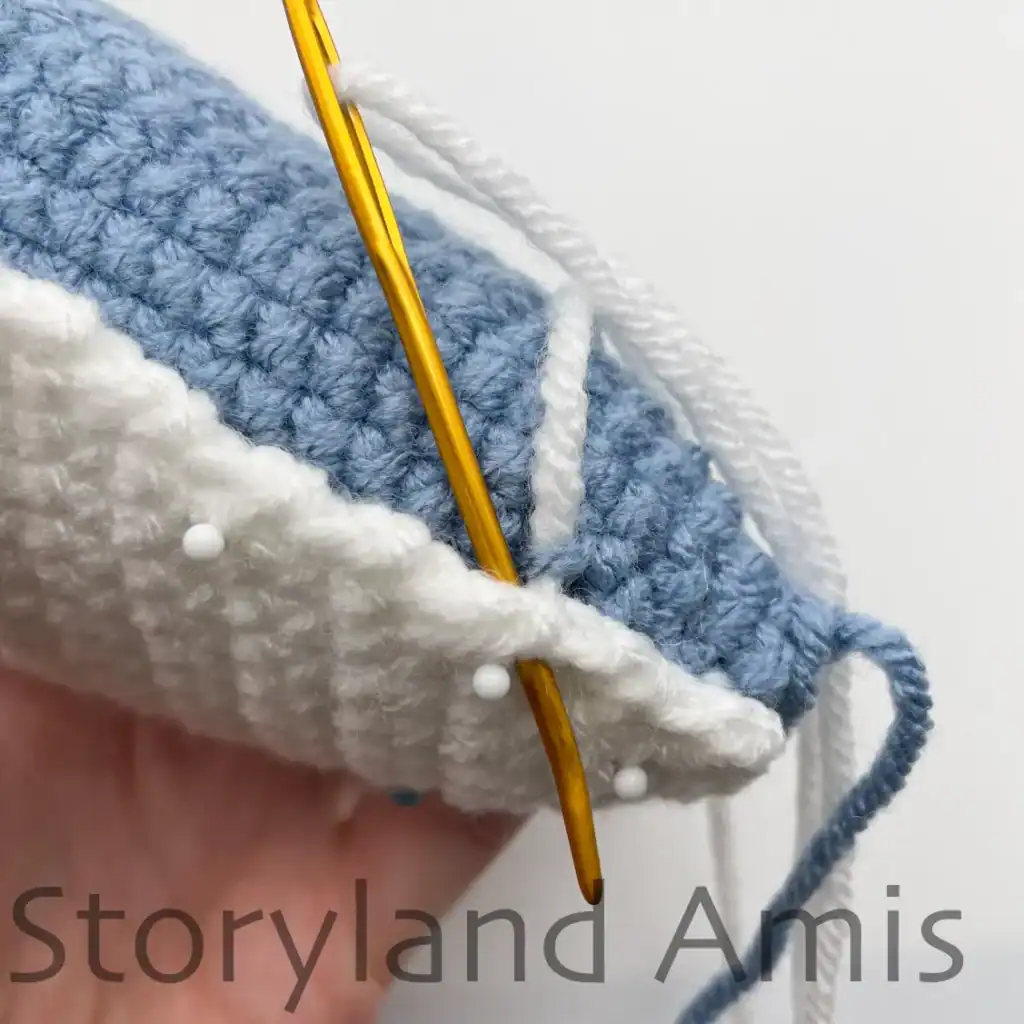
When you are finished, make a knot to secure the sewing and weave the remaining tail into the body to finish (see pic. #11).

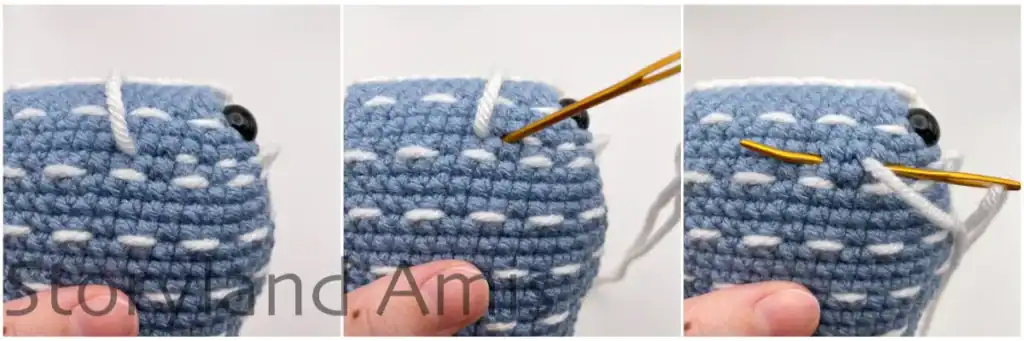
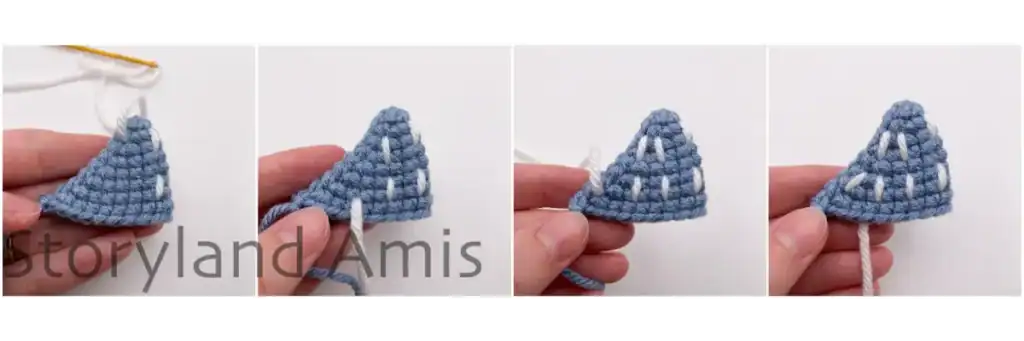
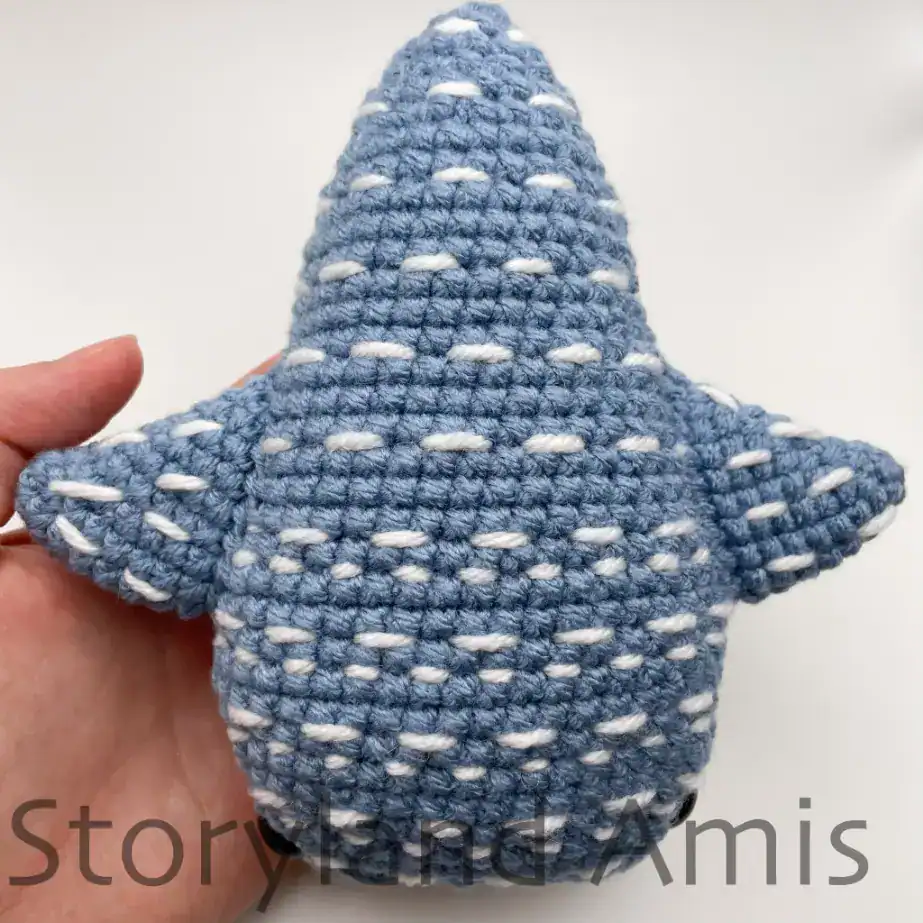
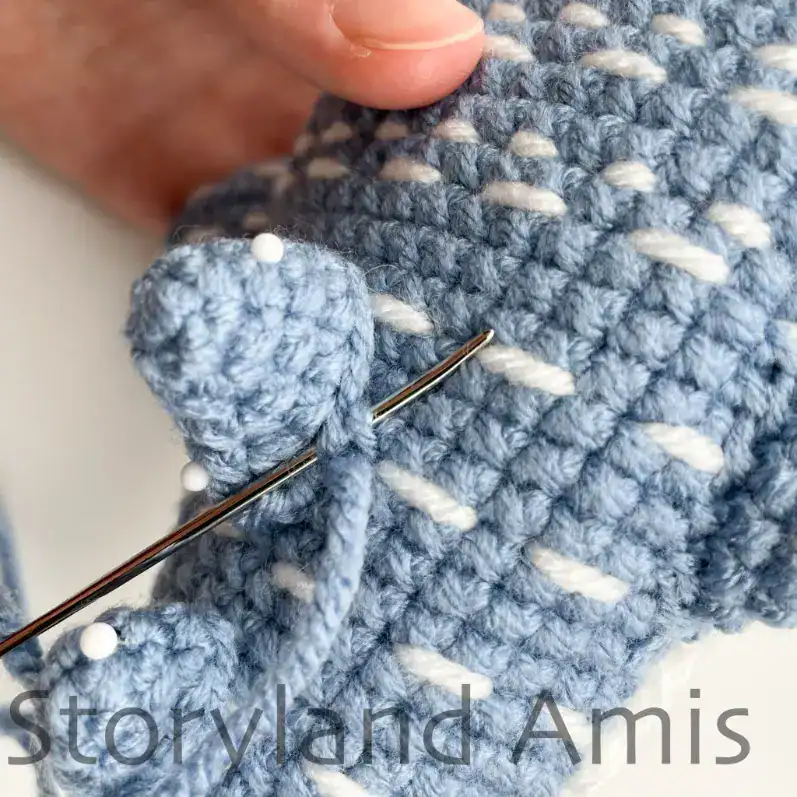
Embroidering the body details (using white yarn)
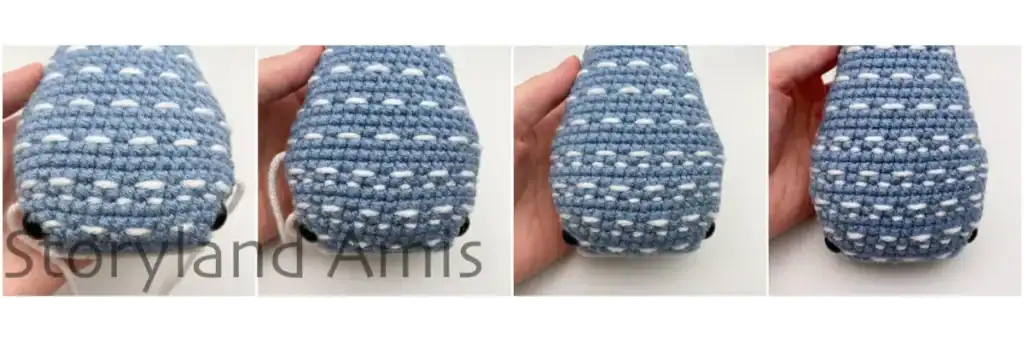
It’s time for us to embroider the white detail on the back of our whale shark. We will first embroider the larger stripes all the way down the body and then embroider the smaller stripes under the large ones halfway down the body.
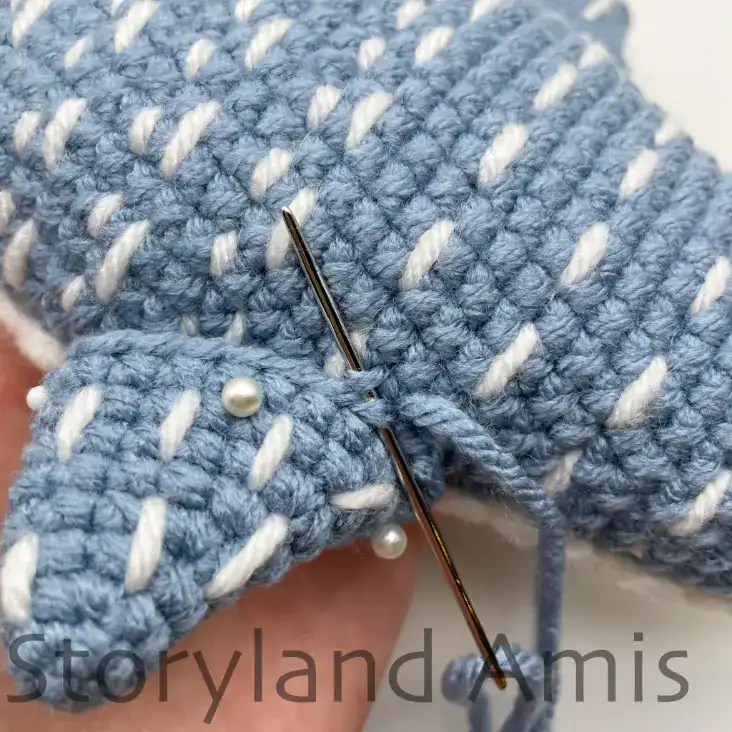
Take some white yarn and your tapestry needle and embroider staight stitches horizontally across the back. Each white stitch will be two single crochet stitches wide and spaced one stitch apart from each other (see first 3 images in pic. #12). Each row of white stitches will be three rows apart from each other (see last 3 images in pic. #12). I ended up with 11 rows of large white stitches on my whale shark.
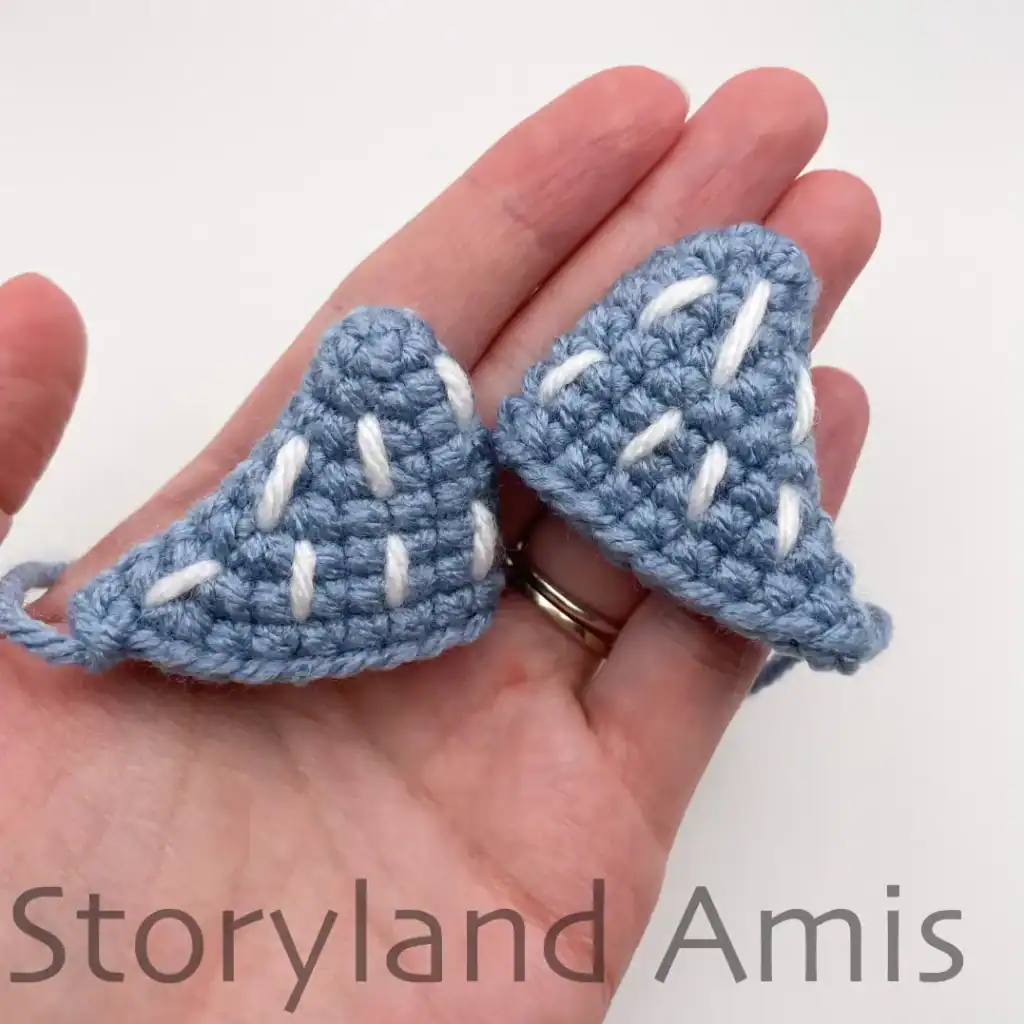
When you have embroidered all the way down the body take some more white yarn and underneath the 2nd, 3rd, 4th, and 5th large white stitch rows, embroider smaller stitches in between the rounds directly underneath the large white stitches. These smaller stitches should be one stitch wide, spaced one stitch apart from each other (see pics. #13 & #14).
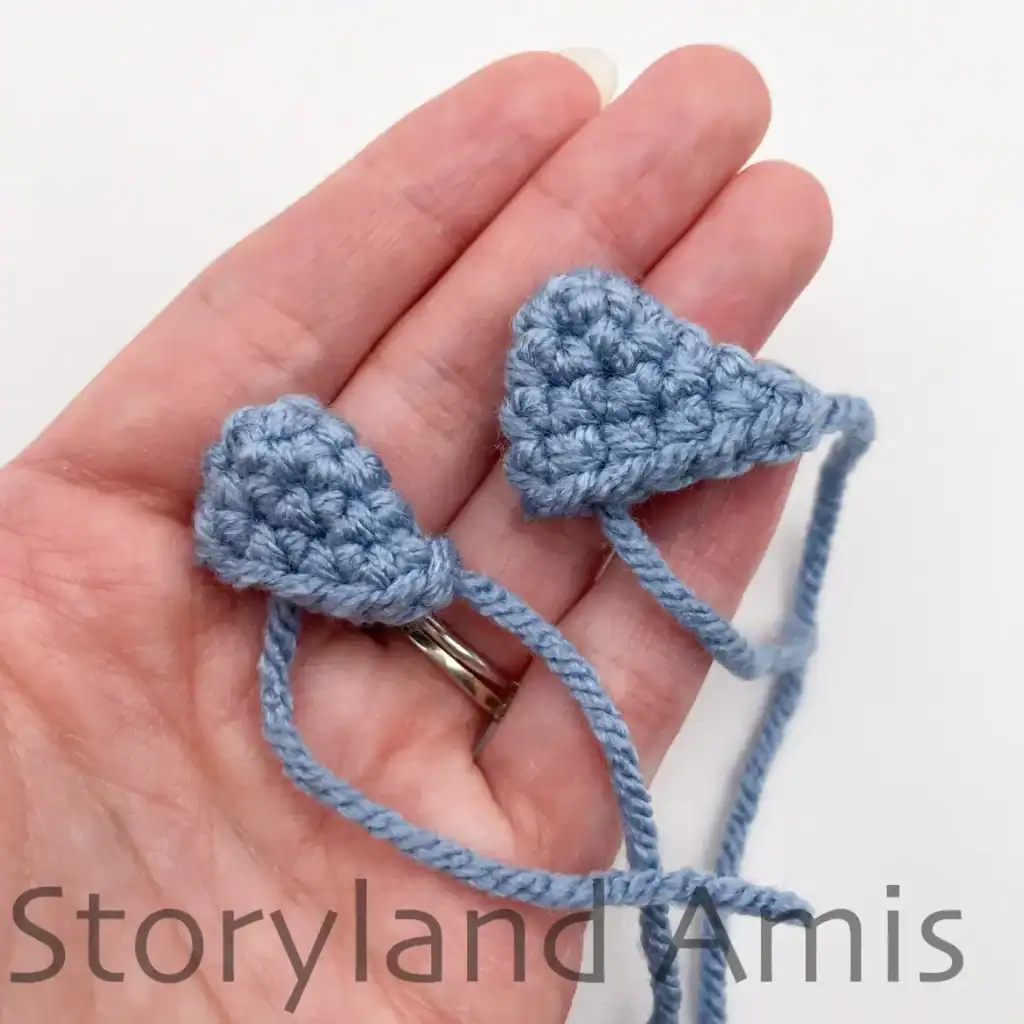
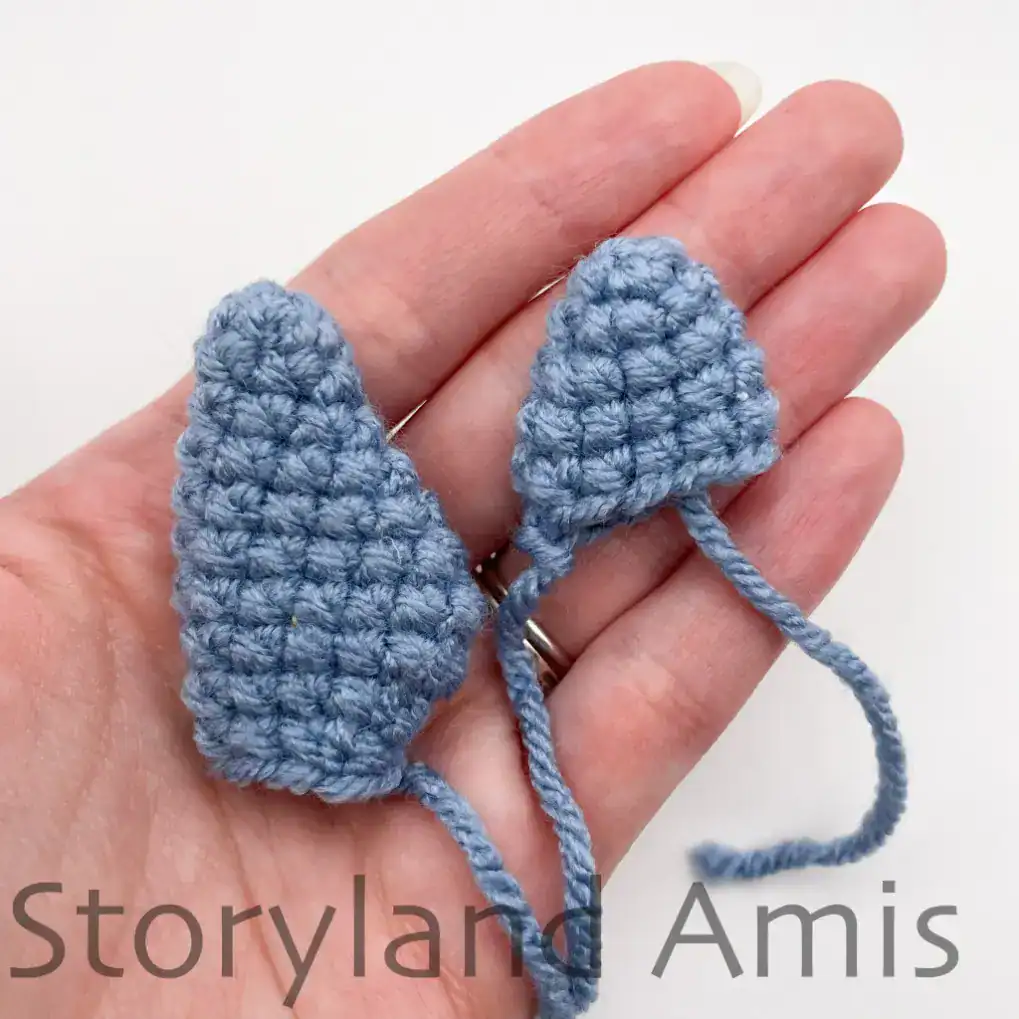
Side fins (make 2 using bluish gray yarn)
R1: ch 2, starting in 2nd ch from hook, sc 4 (4 sts) (you can use the magic circle/ring if you prefer as it won’t make a difference in the end. Watch this video to see how to start crocheting in the round using the “ch 2 method”.)
R2: inc, sc 2, inc (6 sts)
R3: inc, sc 4, inc (8 sts)
R4: inc, sc 6, inc (10 sts)
R5: inc, sc 8, inc (12 sts)
R6: inc, sc 10, inc (14 sts)
R7: inc, sc 12, inc (16 sts)
R8: inc, sc 14, inc (18 sts)
R9: inc, sc 16, inc (20 sts)
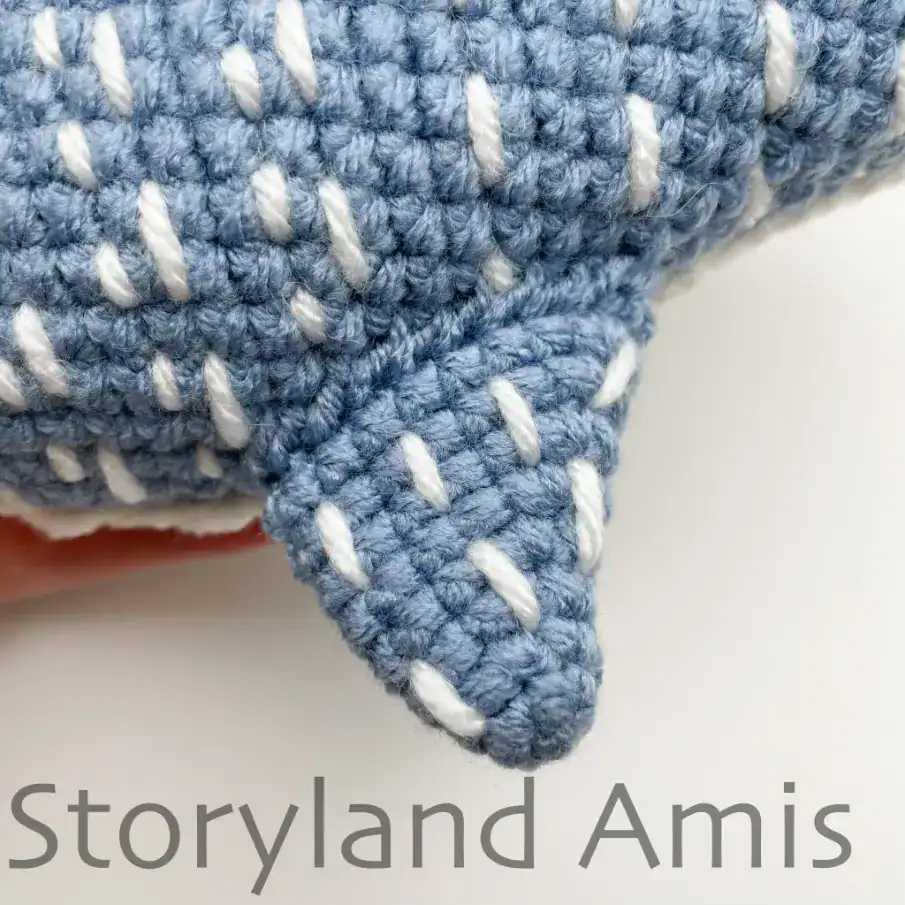
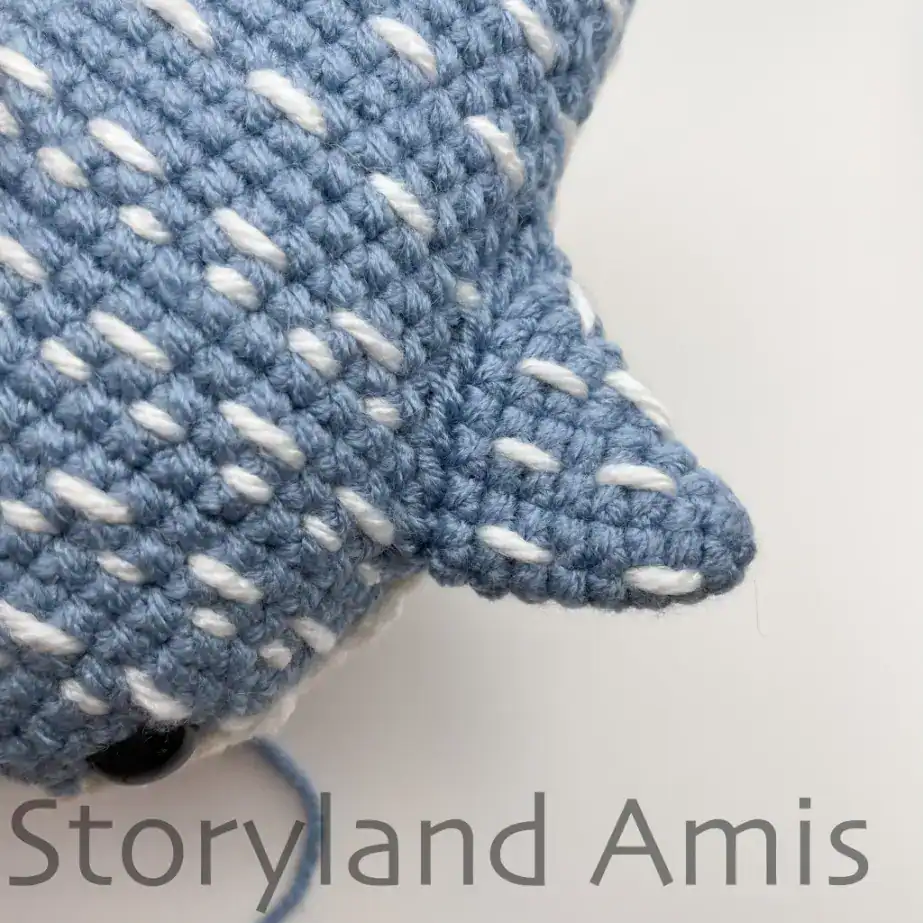
Finish off leaving a long yarn tail for sewing (see pic. #15). Do not stuff.
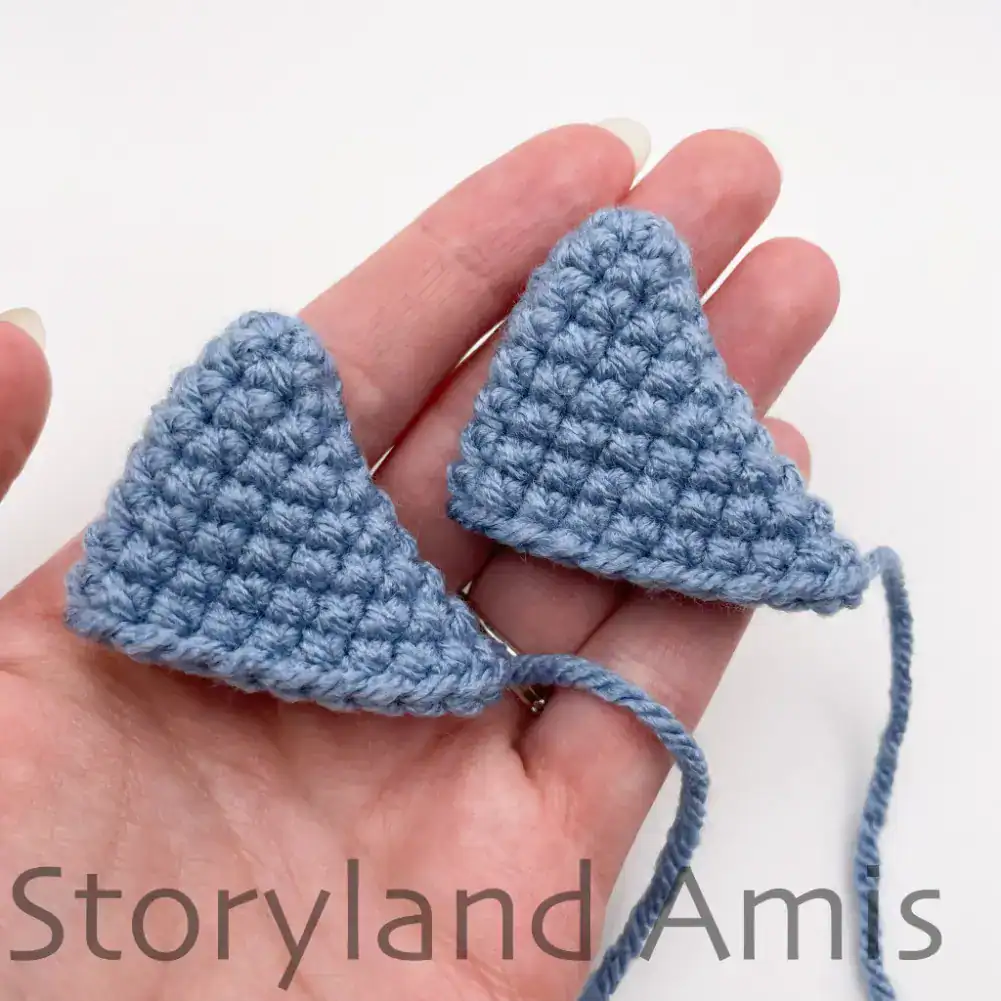
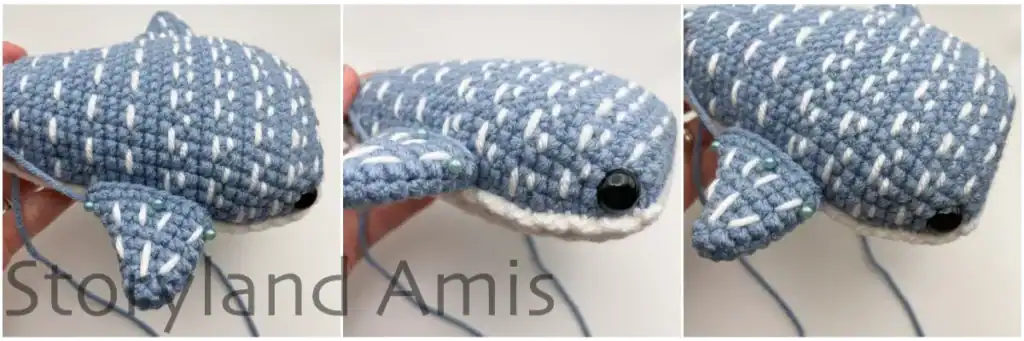
Taking some white yarn, embroider some stitches over the top of the side fins to match the ones on the back of the whale shark (see pic. #16).
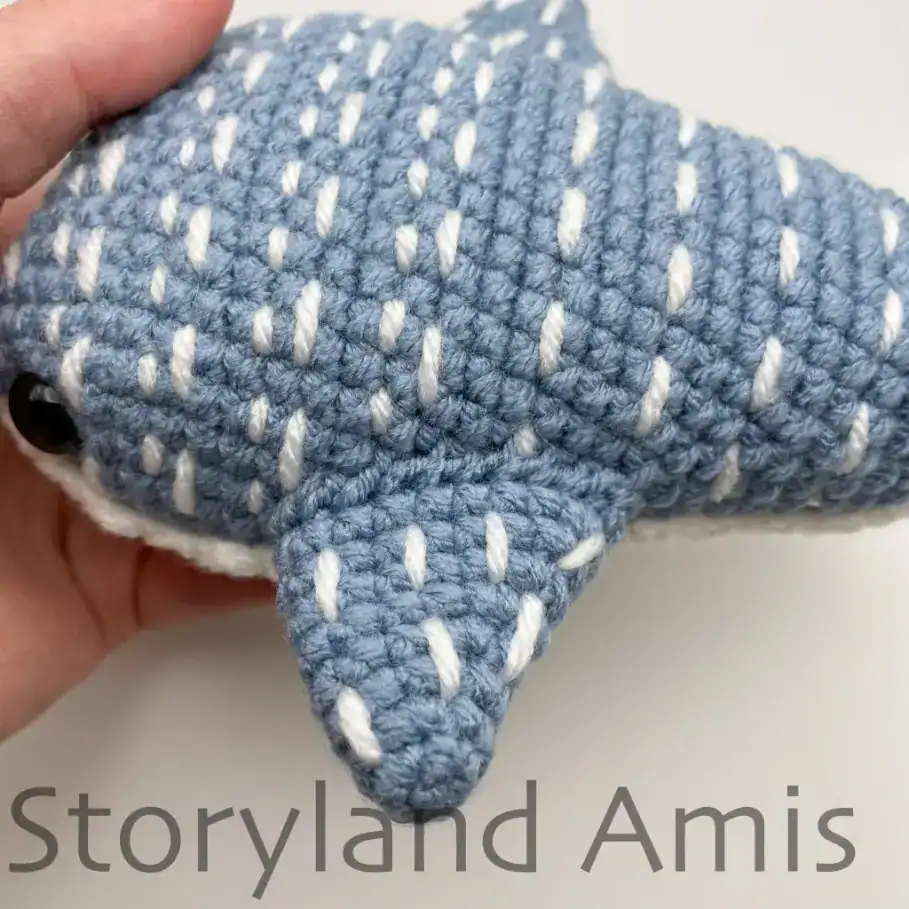
Place the fins on either side of the body over R12-22 approx. (see pics. #17, #18, & #19) just above the white belly piece.
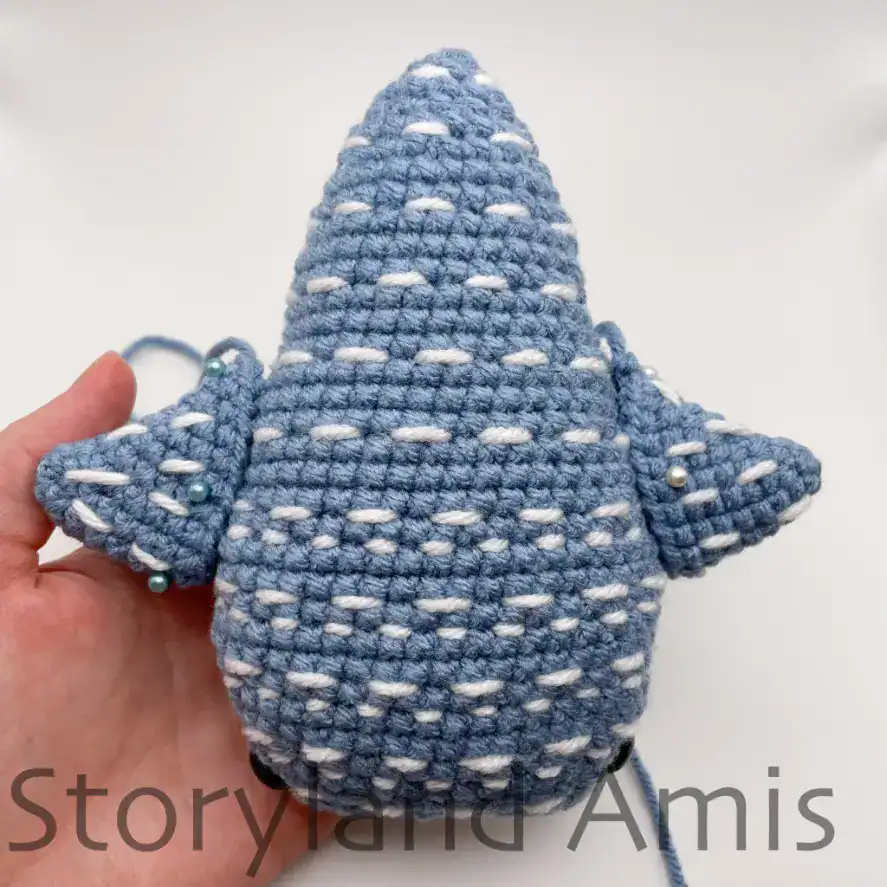
Pin the fins to the sides of the body so that they don’t shift around while sewing them on.
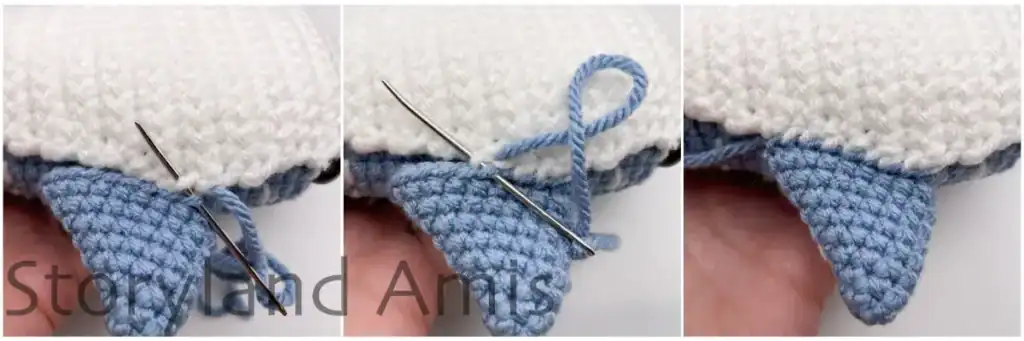
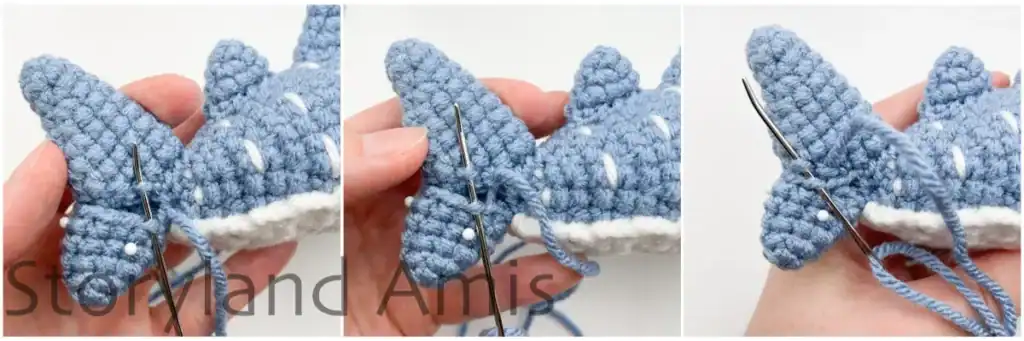
You will sew the bottom of the fin to the outer edge of the white belly piece as seen in pic. #20. Sew the fins on (see pic. #21).
When finished, knot the ends to secure and weave the remaining tails into the body.

Get 24 patterns in this exclusive bundle!
For less than $15, you can get every Christmas pattern I’ve ever designed! Plus FREE access to any future Christmas designs for life.
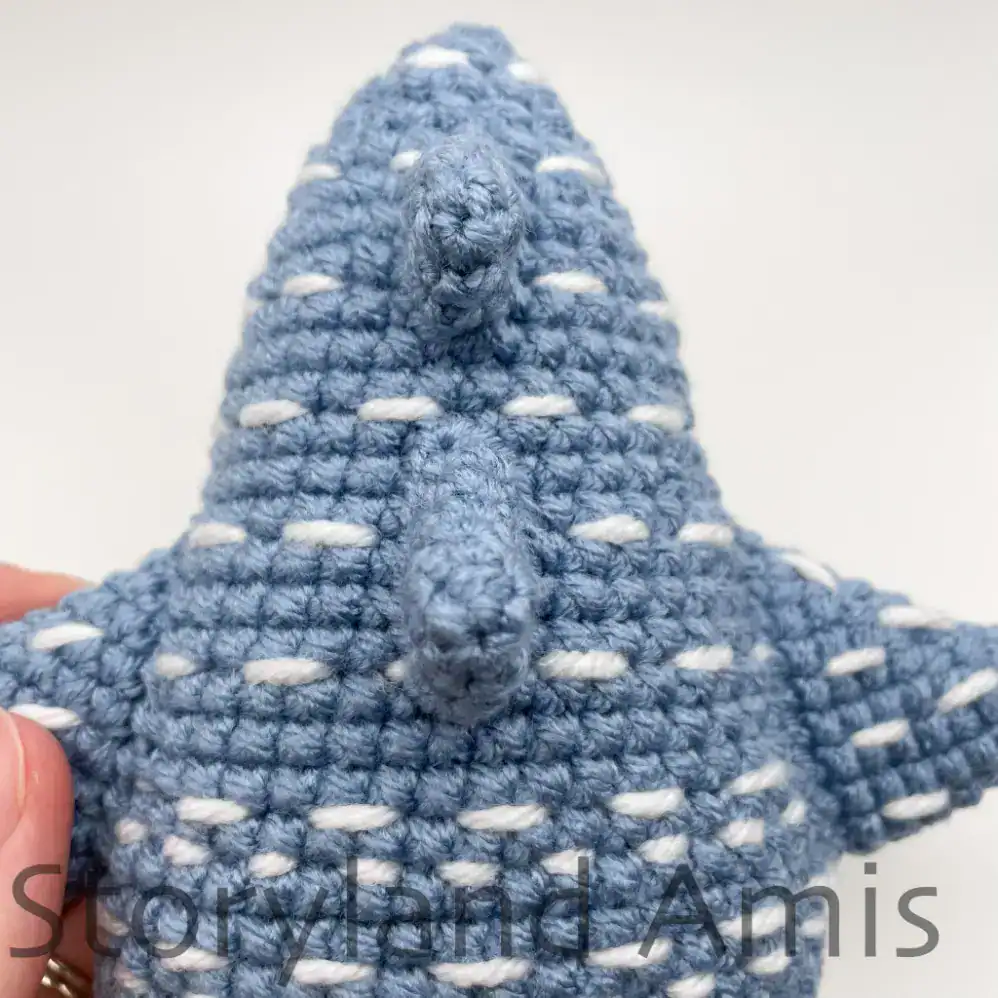
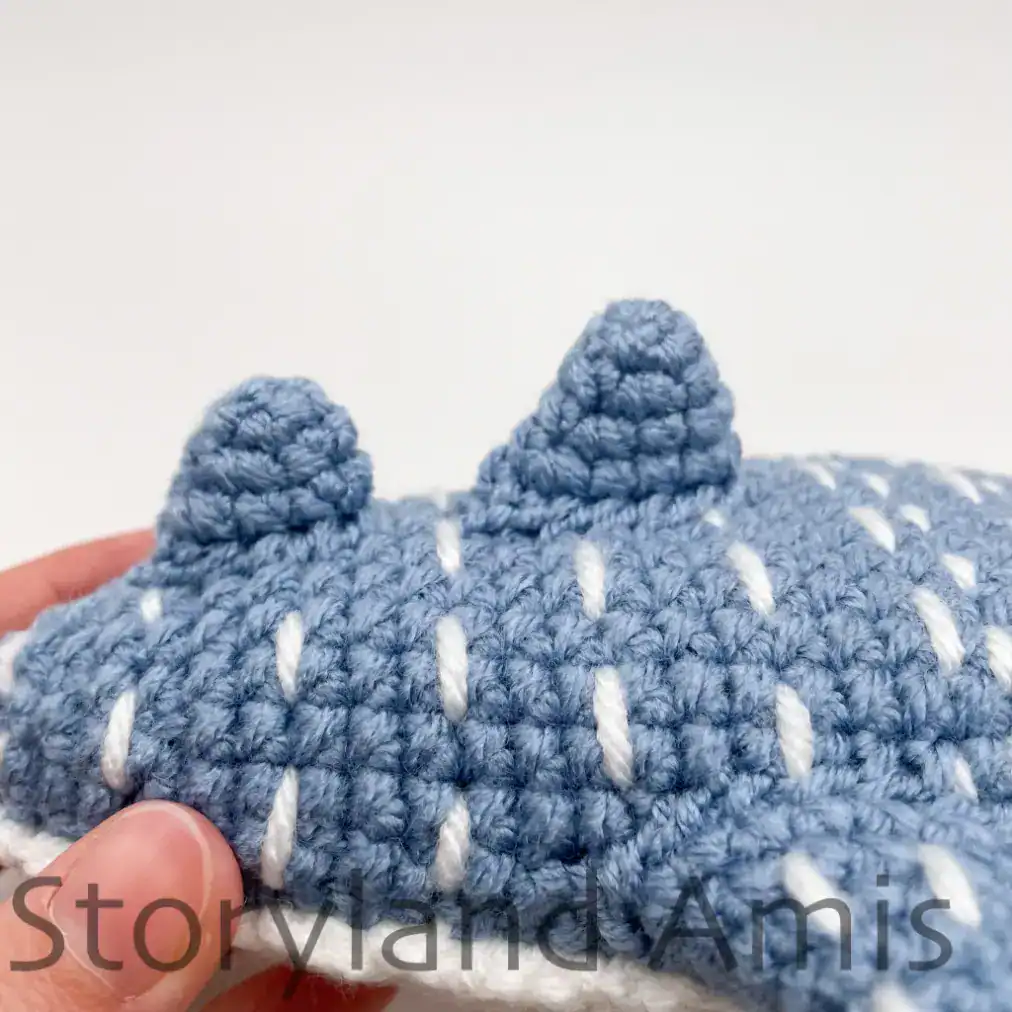
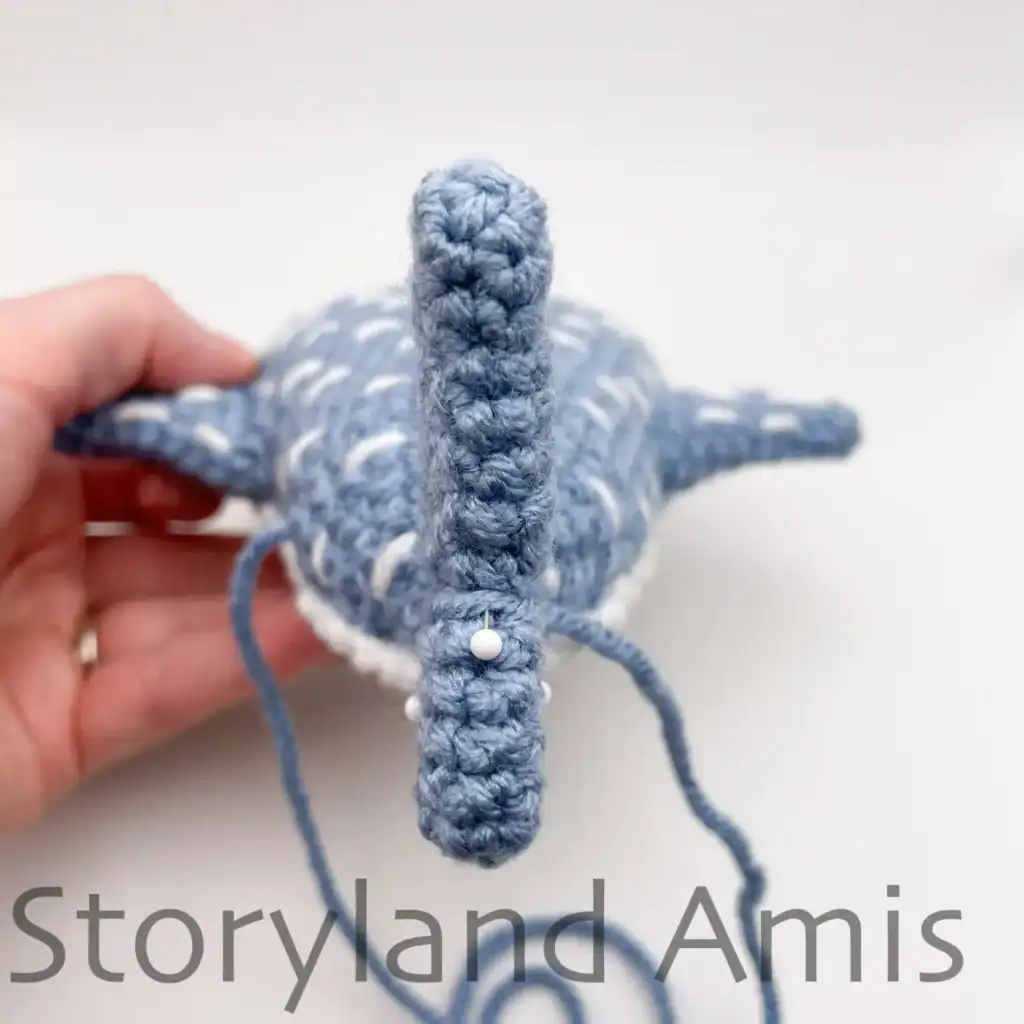
Small back fin (using bluish gray yarn)
R1: ch 2, starting in 2nd ch from hook, sc 4 (4 sts)
R2: inc, sc 2, inc (6 sts)
R3: inc, sc 4, inc (8 sts)
R4: inc, sc 6, inc (10 sts)
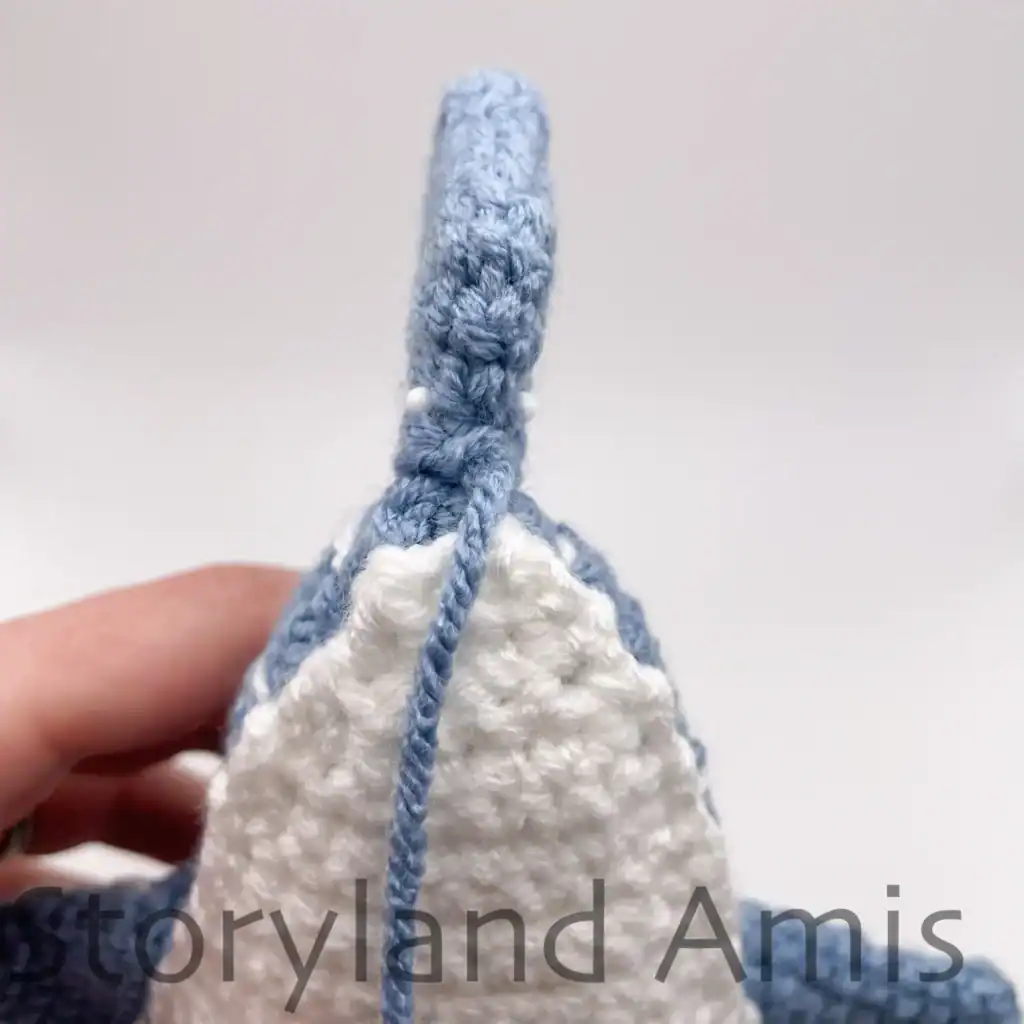
Finish off leaving a long yarn tail for sewing (pic. #23). Do not stuff. Set aside until we finish the large back fin.
Large back fin (using bluish gray yarn)
R1: ch 2, starting in 2nd ch from hook, sc 4 (4 sts)
R2: inc, sc 2, inc (6 sts)
R3: inc, sc 4, inc (8 sts)
R4: inc, sc 6, inc (10 sts)
R5: inc, sc 8, inc (12 sts)
Finish off leaving a long yarn tail for sewing (see pic. #23). Do not stuff.
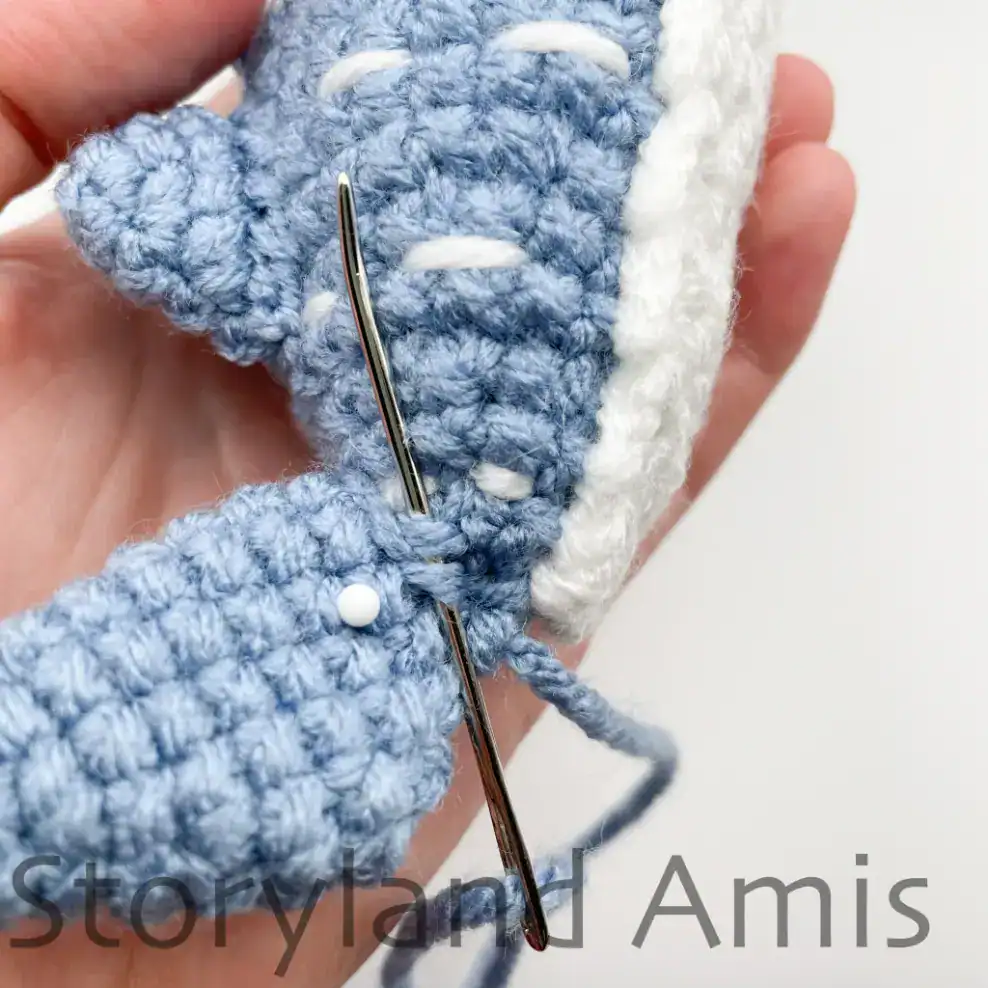
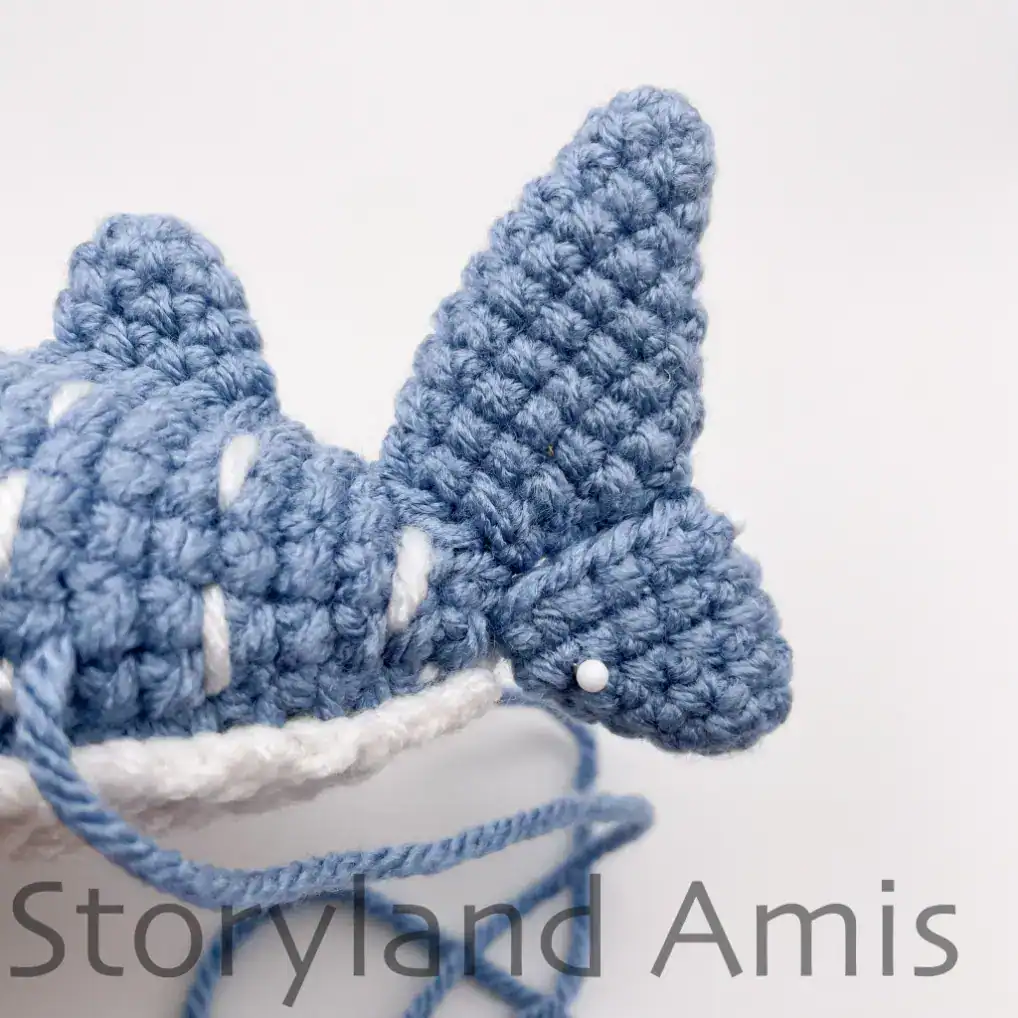
Place the large fin over R18-24 of the back of the body and pin it in place. Then, place the small fin over R26-31 of the body and pin it in place (see pic. #24).
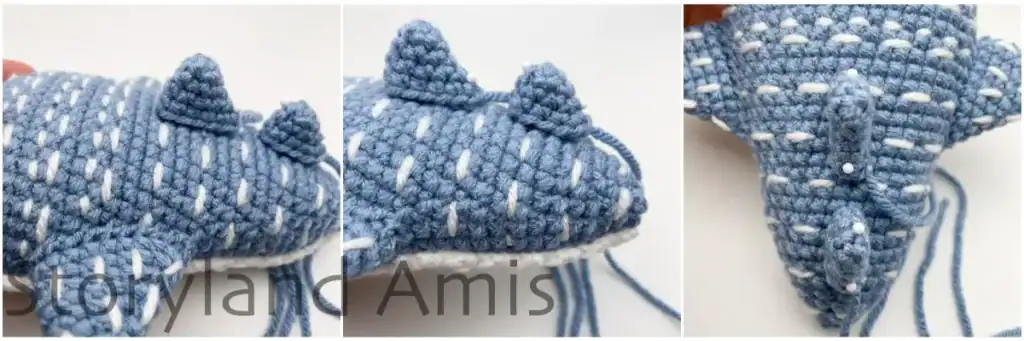
Now, sew the fins to the body using your yarn tails and tapestry needle (see pic. #25).
When finished, knot the ends to secure and weave in all ends (see pic. #26).
**The tail is made in two parts (small tail fin piece and large tail fin piece) and then sewn together.
Small tail fin piece (using bluish gray yarn)
R1: ch 2, starting in 2nd ch from hook, sc 4 (4 sts)
R2: inc, sc 2, inc (6 sts)
R3: inc, sc 4, inc (8 sts)
R4: inc, sc 6, inc (10 sts)
R5: inc, sc 8, inc (12 sts)
R6: dec, sc 8, dec (10 sts)
Finish off leaving long tail for sewing ( pic. #27). Do not stuff. Set aside until we make the large tail fin piece.
Large tail fin piece (using bluish gray yarn)
R1: ch 2, 4 sc in 2nd ch from hook (4 sts)
R2: inc, sc 2, inc (6 sts)
R3: sc in all 6 sts (6 sts)
R4: inc, sc 4, inc (8 sts)
R5: inc, sc 6, inc (10 sts)
R6: sc in all 10 sts (10 sts)
R7: inc, sc 8, inc (12 sts)
R8: inc, sc 10, inc (14 sts)
R9: dec, sc 10, dec (12 sts)
R10: dec, sc 8, dec (10 sts)
R11: dec, sc 6, dec (8 sts)
Finish off leaving a long yarn tail for sewing (see pic. #27). Do not stuff.
Sewing the Tail Fins to the Body
Watch this video to learn how I sewed the LARGE tail fin on.
Watch this video to learn how I sewed the SMALL tail fin on.
Place the large tail fin over R33-34 of the body approx. (see pic. #28).

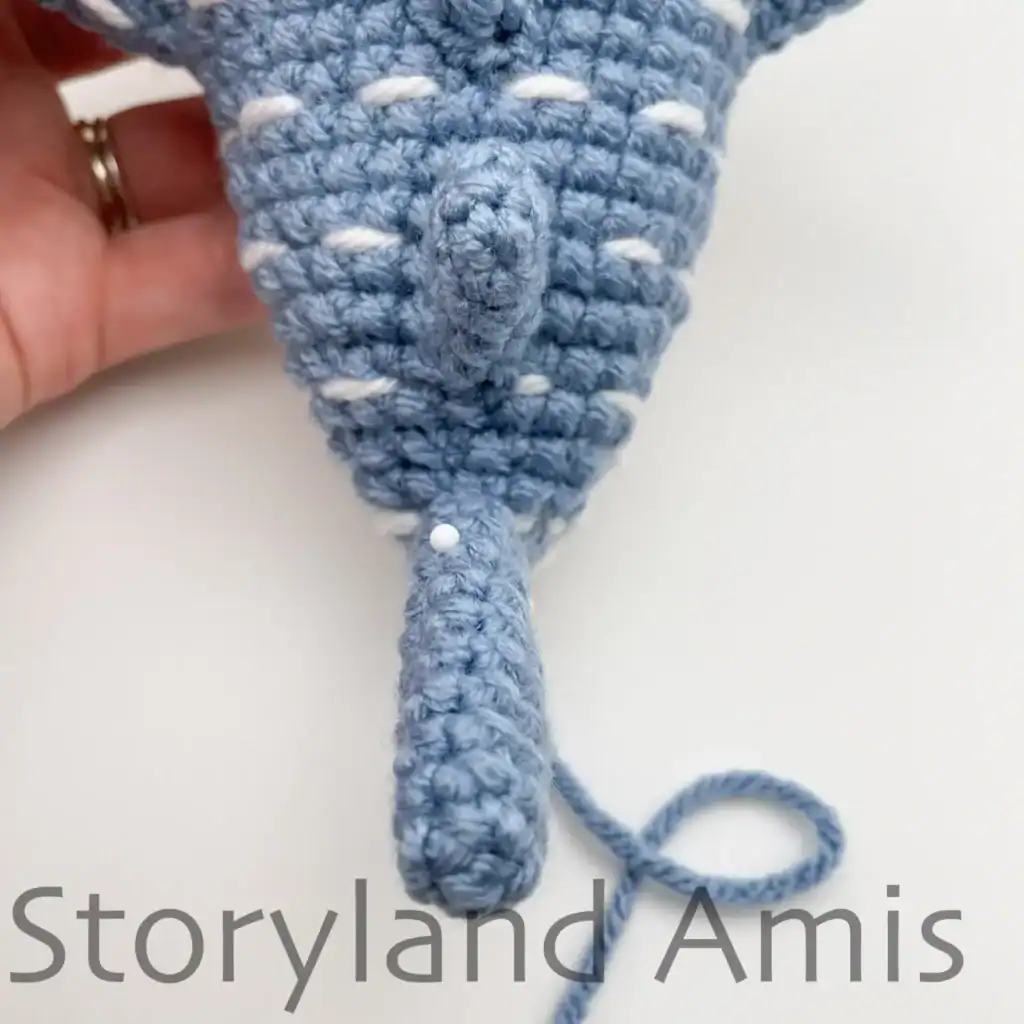
Pin it into place so that it stays put and sew it to the body (see pic. #29). When finished, knot the end to secure and weave the remaining tail into the body.
Now, place the small tail fin piece up against the large tail fin piece with the decreases from R6 facing down. The opening of the small tail piece will be placed against the bottom of the large tail piece (see pics. #30 & #31).
Pin it to the large tail piece to keep it in place, then sew it on (see pic. #32). When finished, knot the end to secure the sewing and weave the remaining tail into the body.
Congratulations—you’re done! I hope you enjoyed making this free whale shark amigurumi crochet pattern. I would love to see pictures of your finished project!
If you make this free whale shark amigurumi crochet pattern, share your creations with me via social media or email me directly! You can find me on Instagram (@storyland_amis) and Facebook (Storyland Amis).
Thanks for stopping by! Until next time, then – stay crafty!
Get 24 patterns in this exclusive bundle!
For less than $15, you can get every Christmas pattern I’ve ever designed! Plus FREE access to any future Christmas designs for life.
tried & tried to print but wouldn’t show pictures
Hi, Barb, I’m so sorry about that! I do offer a printable PDF version on my website, http://www.storylandamis.com. I understand that you’d like to print the free version, and I apologize for the inconvenience!
what a cute pattern! thank you for sharing it!
I’m so glad you like it! I hope you enjoy making him!
I have just begun this pattern, but I do not see where to use a slip stitch to start working in the round. It is very possible I missed that instruction, but I’ve read over the steps dozens of times and do not see where you go from a chain to a round. Thanks!
Hi, Stella! I use the “ch 2 method” when I start my pieces in the round. You can find instructions on how to do that here: https://www.youtube.com/watch?v=GMftzQo4rfM&ab_channel=StorylandAmis. If you know how to do the magic circle/ring and are more comfortable starting that way, then I would suggest sticking with that method! The magic ring and “ch 2 method” can be used interchangeably.
Thank you for sharing this wonderful pattern!
My daughter has been begging me for a crochet whale shark. It turned out amazing.
What do I have to do, for example, when I finish R3 but my hook is not positioned at the side of the whale shark? I do all the steps right, but it just doesn’t match up, and after it’s wonky, so I keep on taking it out.
Hi, Magdalena!
It sounds like what you’re experiencing is the result of working in continuous rounds vs joined rounds. When you work in continuous rounds like this pattern calls for, the stitches will naturally slant as you crochet. This is totally normal when making amigurumi in the round, and nothing you need to try and fix. Your hook will be positioned a little differently after every round. Since I wrote this pattern with this in mind, it will all work out in the end, and I made sure to position the increases and decreases in the pattern to compensate for this normal slanting of stitches. I hope this answers your question! Let me know if you need me to clarify anything! 🙂
i made the little whale and he came out lovely. the pattern is well written,with lots of pictures. I love it, thank you so much.Liliane
I really enjoyed this pattern. It turned out really well and was easy to follow. It tought me some new techniques that I will for sure be using again.
Hi Lucy,
I’m so glad you enjoyed this pattern! Thank you for your comment! 🙂
this pattern was amazing! Though I haven’t crocheted much before, this was an amazing pattern to practice new things and I love the result so much!!! Thank you for creating this amazing pattern!!
Hi Varvara!
Thank you so much for your comment! I’m so happy you loved this pattern and were able to learn some new skills!! 🙂 Have a great day!
I’m totally confused on how to start the body. I’m relatively new to crochet. Is there a different way to explain how to crochet an oval shape? I watched the video but I think that confused me even more.
Hi Binni,
I’m so sorry you are having trouble starting the body! I’ve actually just made a video walking you through the first two rounds of the body here: https://www.youtube.com/watch?v=OLsOBBXarRc. Please let me know if this was helpful! 🙂
This is probably operator error, but I keep having to redo it. The last time before I redid it, I kept doing it even though it looked wrong thinking it might work itself out, but it didn’t. So pretty much my problem is that on r4 I keep getting to the *s1 inc* rep 3 and the stitch starts out a little more than halfway through the long side and it pretty much looks like this _____—___ (I’m sorry I didn’t know how to explain it) but it just makes it a wonky
| | shape and I’m not sure what I’m doing wrong. (If it’s not obvious am
—–___—- new to crochet and this is my first project.)
Hi Maria,
I think I understand what you are trying to say! So, as you’ve probably surmised, the increases are meant to be spaced over the corners/edges of the body. If things don’t seem to be lining up, it’s likely you’re stitches are just looser than mine. To compensate for this, look at the body and place the increases wherever the corners are for you personally. Does that make sense? Just as long as you make the same amount of increases as each round calls for and the stitch count at the end of each round is correct, you can place the increases wherever you need to so that it doesn’t turn out wonky. I hope this helps! Feel free to reach out with any other questions!
I have LOVED making this but when you finish the white details on the whale sharks back, how did you tie it off?
Hi Jerica!
I didn’t tie a knot on the embroidery; I just wove the ends into the inside of the whale shark. If you wanted to make it more secure, you could weave the remaining sewing tail over to the starting tail of your embroidery and tie the two ends together, and then weave them into the body. 🙂
Hi there! If I wanted to make this shark bigger, would I just double, or triple all the instructions? I wasn’t sure how the instructions would translate to a bigger size. Thanks!
Hey, Aud!
You could try that, but unfortunately, there’s no simple formula for increasing the size of an amigurumi. It usually takes a lot of trial and error to get it to look like the original. I am in the process of designing a giant whale shark, though, so stay tuned for that! 🙂
Amei fazer o tubarão!! Ficou super fofo e foi bem rápido e fácil de fazer, as instruções estavam claras e as fotos ajudaram muito!! Obrigada por nos oferecer esta receita de forma gratuita ♡♡ é muito bonita mesmo ♡♡♡
I really love this pattern. If I credit you fully, am I allowed to sell the finished product?
Thank you! And yes, you can certainly sell the finished product! 🙂 Thanks for asking!
Thank you so much!