
Last Updated on October 20, 2026 by Holly Lanier
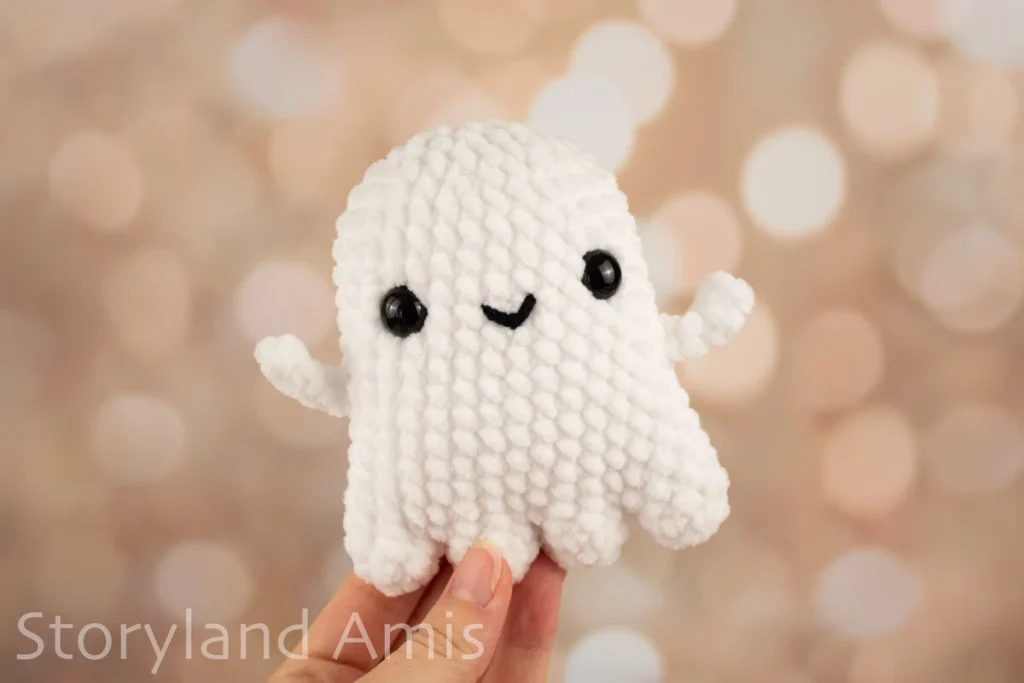
Halloween is just a little over a week away. You might think that you don’t have time to make any more Halloween projects, but I assure you, this free no-sew ghost amigurumi is the perfect last-minute project! In just a couple of hours or less, you can easily whip up one of these easy plush ghouls in time for spooky season! He’d make a great addition to a boo basket too!
Meet Ghostopher the Ghost! This adorable ghoul loves a crisp Autumn night. His favorite place to haunt is the local pumpkin patch, where he spends most of his nights. Ghostopher is mostly a solitary ghost, but I don’t think he’d mind a plush friend or two!
You can purchase a printable, ad-free, beautifully formatted, concise version of this ghost crochet pattern in my shop HERE. Otherwise, please keep scrolling down for the free version!
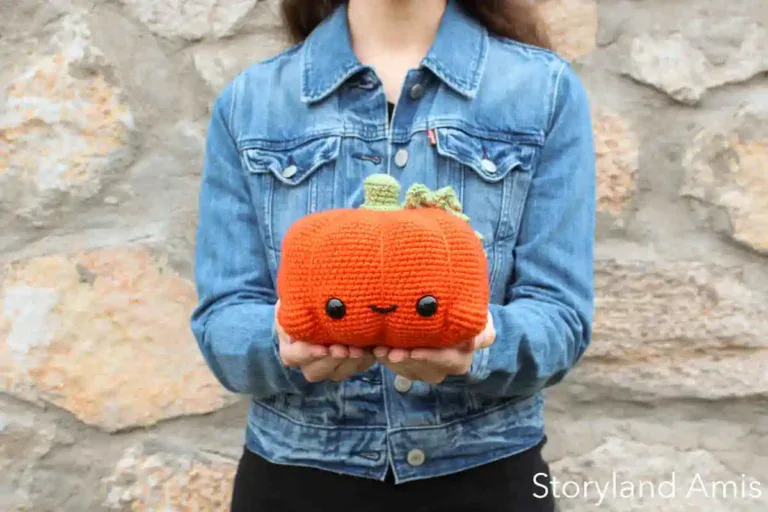
Looking for more cute and spooky Halloween amigurumi patterns? Check out the FREE patterns for Jimmy the Baby Pumpkin and Scout the Baby Ghost!
Disclaimer: Some links in this free no-sew ghost amigurumi pattern may be affiliate links. Affiliate links are a way for me to make a small commission on certain products at no extra cost to you!

Materials You Need
- #6 super bulky yarn. I used Parfait Chunky by Premier Yarns in the color “White”
- A small amount of black worsted-weight yarn for the mouth
- I (5.5 mm) crochet hook
- 12 mm black safety eyes
- Fiberfill (or your stuffing of choice)
- Bent tip tapestry needle
- Scissors
- Stitch marker
Abbreviation Key
Abbreviations are in U.S. terms.
- sc – single crochet
- st/sts – stitch(es)
- sl st – slip stitch
- dec – decrease (join the next 2 stitches together)
- inc – increase (2 single crochet in the next stitch)
- R – round
- rep – repeat
- ** – repeat the group of instructions between the asterisks the number of times indicated.
Note: All rounds are worked continuously (that is, vs. joined rounds.)
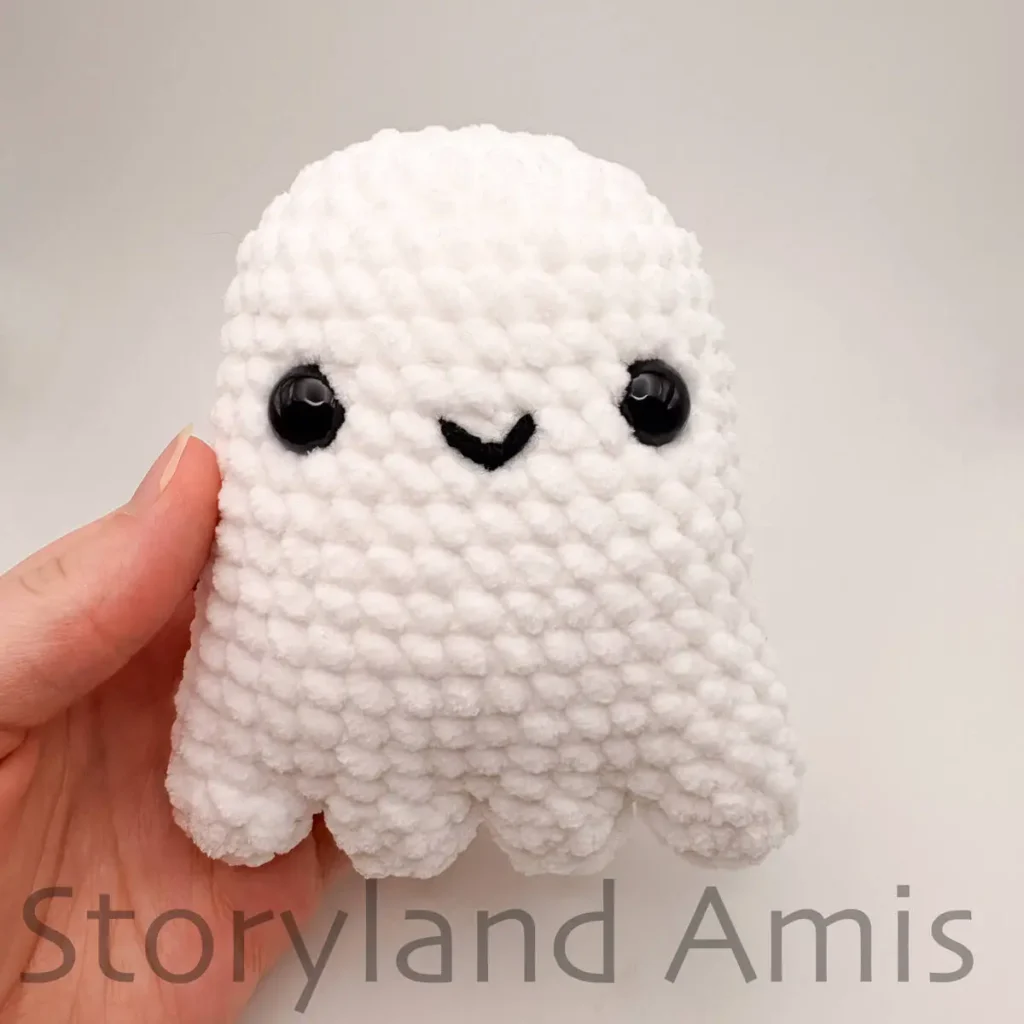
The finished size is approximately 4.5 in. (11.5 cm) tall. (Please be aware that your personal gauge, tension, hook size, and the brand of yarn you decide to use will all impact the finished size.)
The pattern and images in this post are the sole property of Storyland Amis. This written pattern is for personal use only. Please do not share, sell, or redistribute it in whole or in part.
You MAY sell the finished product, but please credit Storyland Amis as the designer. If you sell your finished items online, I would appreciate it if you could link them to my blog! You may not mass-produce items made from this pattern. Thank you for your understanding and respect.
Important Additional Info
Starting round: When starting my crochet pieces in the round, I always use the “ch 2 method.” That is perfectly fine if you prefer to start your pieces using the magic circle/ring instead. These two methods are interchangeable, and the end result will be the same regardless of your choice. Watch this short video to learn how to make the “ch 2 method”.
Right vs. wrong side: When working in the round, I always crochet with the “right” side of the stitches facing out. Watch my short video to see the difference between the “right” and “wrong” side of crochet stitches.
Yarn under vs. yarn over: I always yarn under (YU) instead of yarn over (YO) for all my amigurumi. Doing YO might make your amigurumi slightly larger than mine, so keep that in mind if you prefer YO. Watch my video on the differences between yarn under and yarn over.
Stuffing: Check out my short video on how to stuff pieces properly here.
Free No-Sew Ghost Amigurumi Pattern
Bottom Scallops (Make 4 Using White Yarn)
We will make the bottom of the ghost first, starting with the four scallops. We’ll make each scallop separately and then crochet them together.
R1: ch 2, starting in the 2nd ch from hook, sc 6 (6 sts) (you can use the magic circle if you prefer, as it won’t make a difference in the end. In that case you will make a magic circle and make 6 sc in the magic circle. Watch this video to see how to start crocheting in the round using the “ch 2 method”.)
R2: *sc 2, inc* rep 2 times (8 sts)
R3: sc in all 8 sts (8 sts)
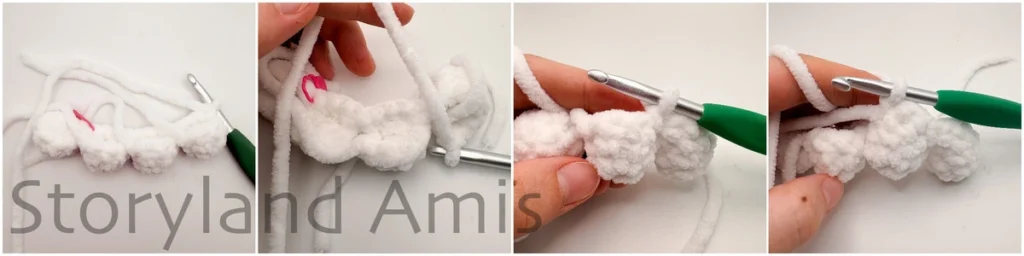
Finish off on the first three scallops, but do NOT finish off on the last scallops (see pic. #1). We will now join the four scallops together to create the bottom of the body.
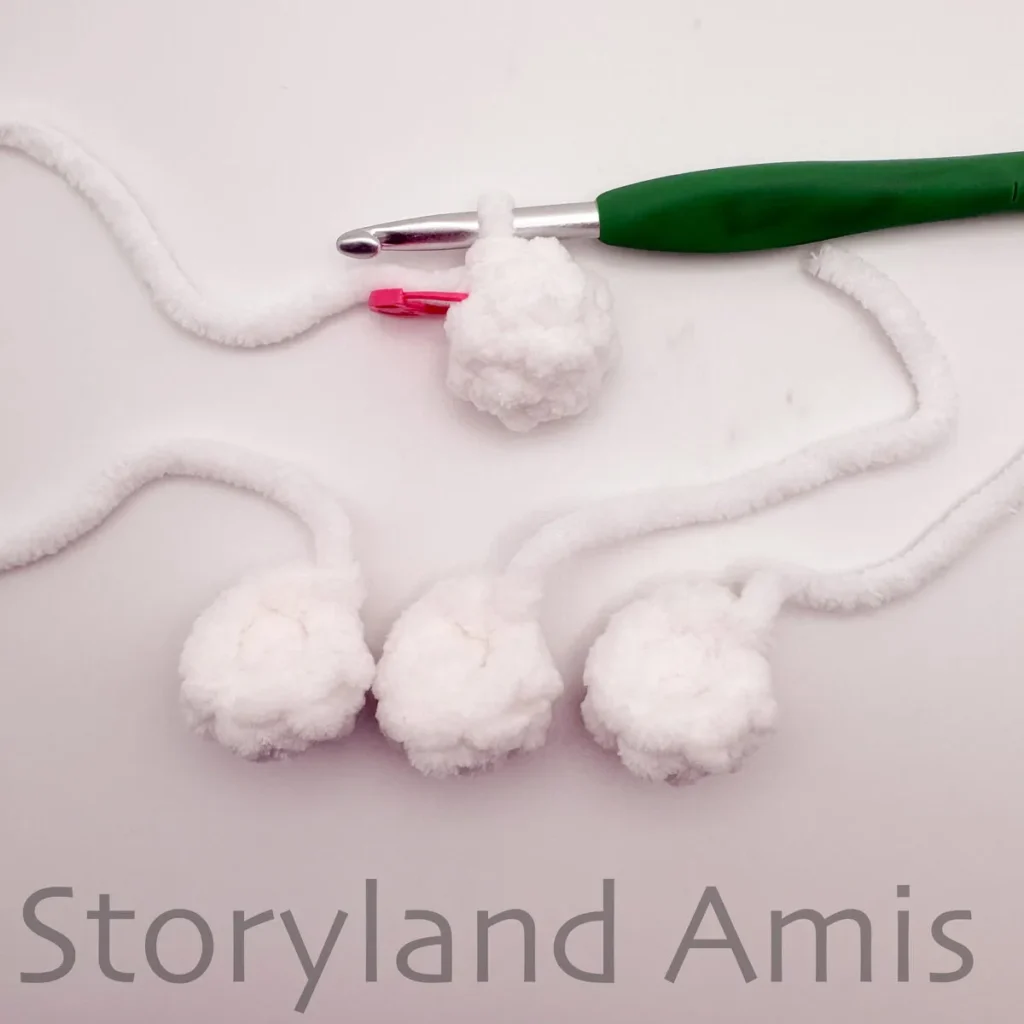
Joining the Scallops
We will now refer to the scallops still attached to your hook as the first scallop, and the scallop we join to it as the second scallop, and so forth.
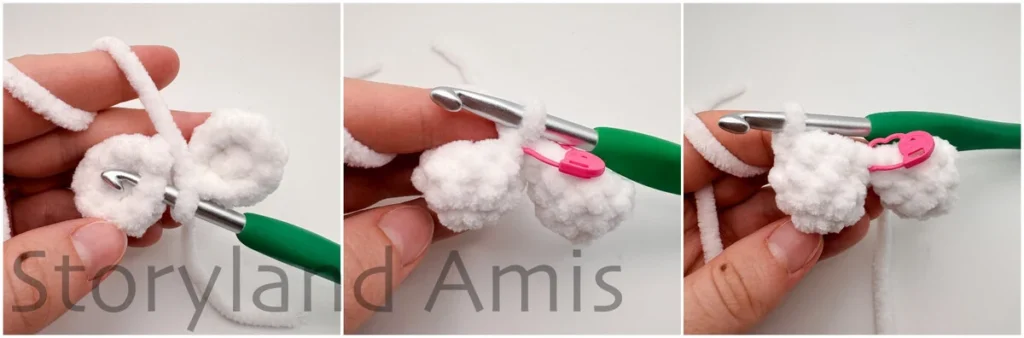
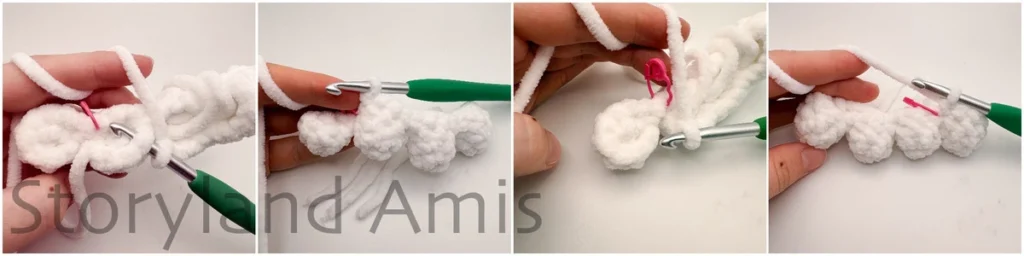
R4: join the first scallop (the scallop still attached to your hook) to one of the other three scallops by making a sc st on the second scallop (see first 2 images in pic. #2). Now make 3 more sc sts on the second scallop for a total of 4 sc sts worked on the second scallop, leaving the remaining 4 sts unworked (see last image in pic. #2).
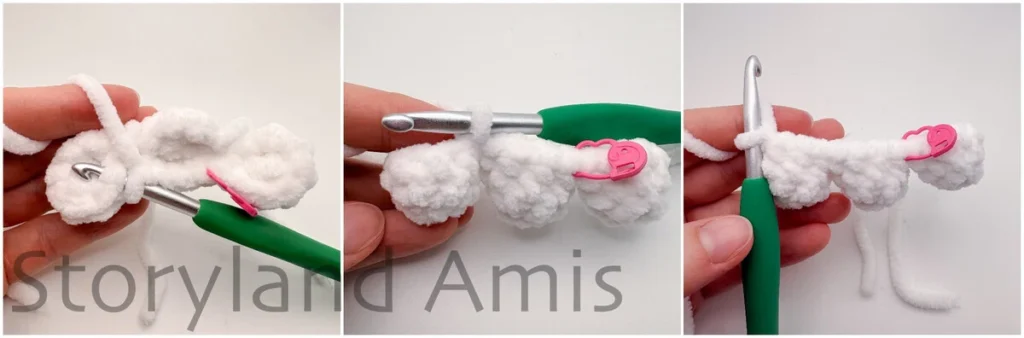
Repeat this sequence by joining the third scallop to the second by making a sc st in the third scallop (see first 2 images in pic. #3). Then make 3 more sc sts on the third scallop for a total of 4 sc sts worked on the third scallop, leaving the remaining 4 sts unworked (see last image in pic. #3).
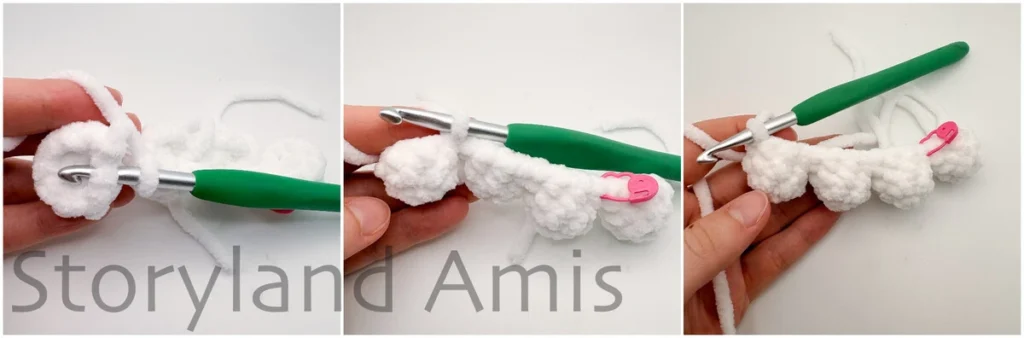
Now, join the fourth scallop to the third scallop by making a sc st on the fourth scallop (see first 2 images in pic. #4). Make 7 more sc sts on the fourth scallop, bringing you to the front of the ghost (see last image in pic. #4 and first 2 images in pic. #5). Now we’ll crochet into the unworked sts we left on the other three scallops. Make 1 sc st in each of the 4 unworked sts on the third and second scallops (see last 2 images in pic. #5 and first 2 images in pic. #6). Then make 1 sc st in each of the 8 sts on the first scallop (see last 2 images in pic. #6). You should now have a total of 32 sts on R4.
Body (Continuing in White Yarn)
R5-10: sc in all 32 sts (6 rounds total at 32 sts each)
Mark R10 of the body with a stitch marker, as we will be crocheting the arms to this round of the body later.
R11-17: sc in all 32 sts (7 rounds total at 32 sts each) (see pic. #7)
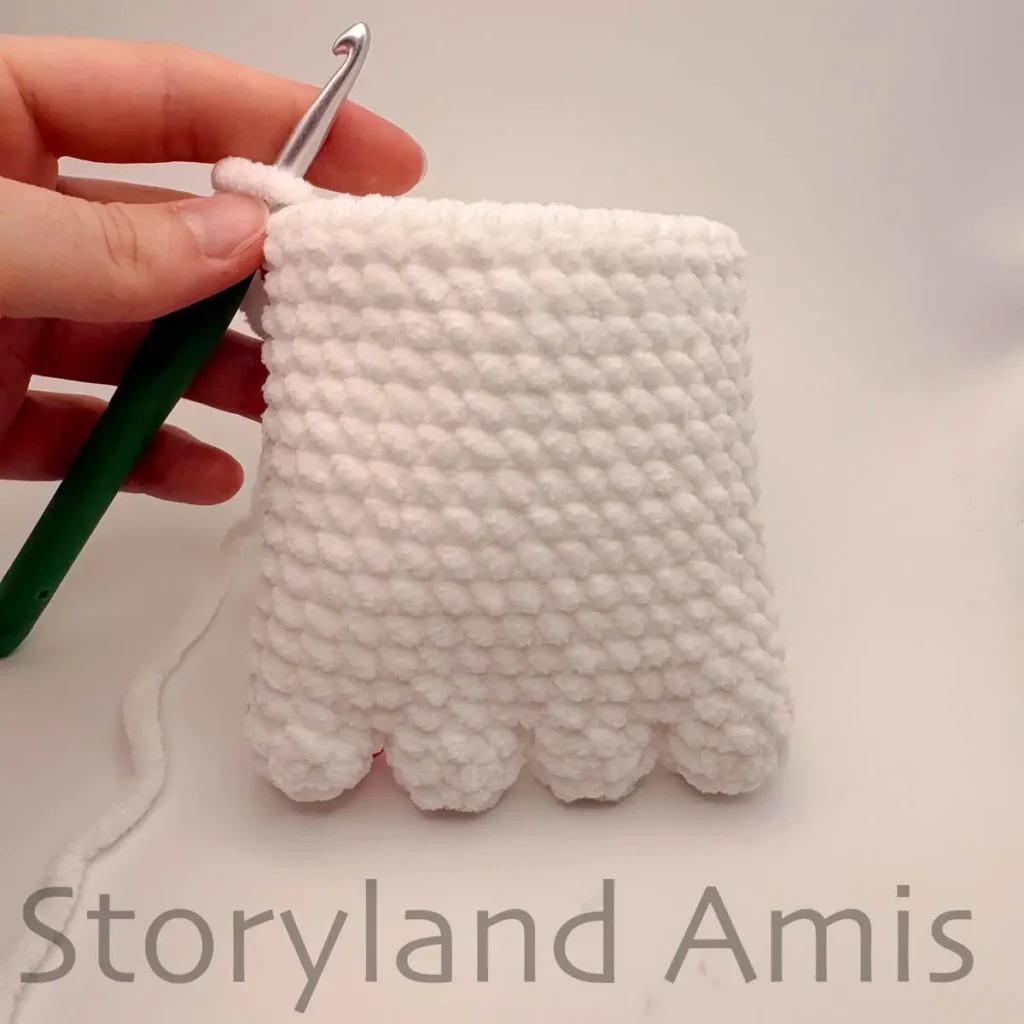
R18: *sc 2, dec* rep 8 times (24 sts)
We will now add the eyes and mouth. Insert your 12mm safety eyes between R13 & 14 of the head, spaced 8 sts apart (Hint: Insert the 1st eye. Count 8 sts from the hole where you inserted the 1st eye and insert the 2nd eye. There should be 6 full visible sts between the two eyes. See pic. #8).
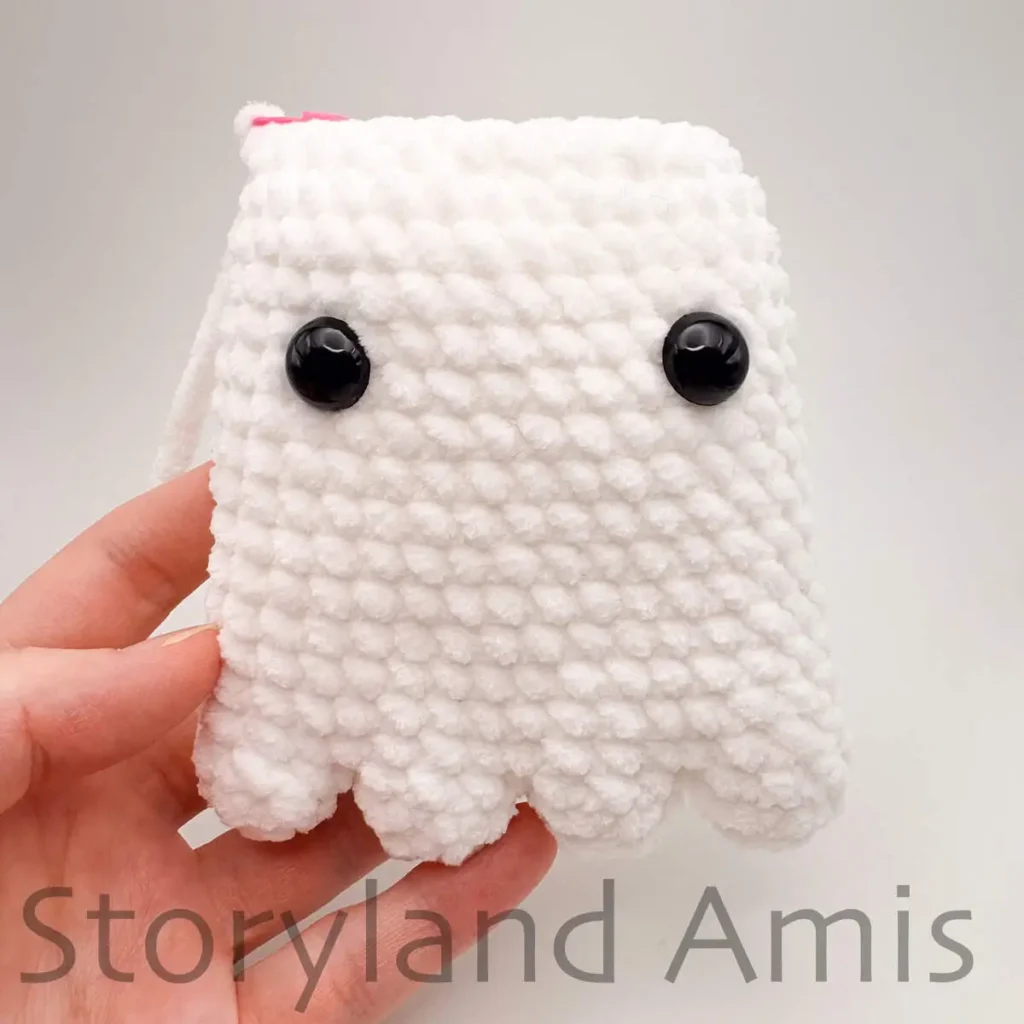
Using your black worsted-weight yarn split in two and a tapestry needle, embroider a smile centered between the eyes over R13 of the head (see pic. #9). The smile should be about 2 sc sts wide. Watch this short video to see how I embroider my smiles.
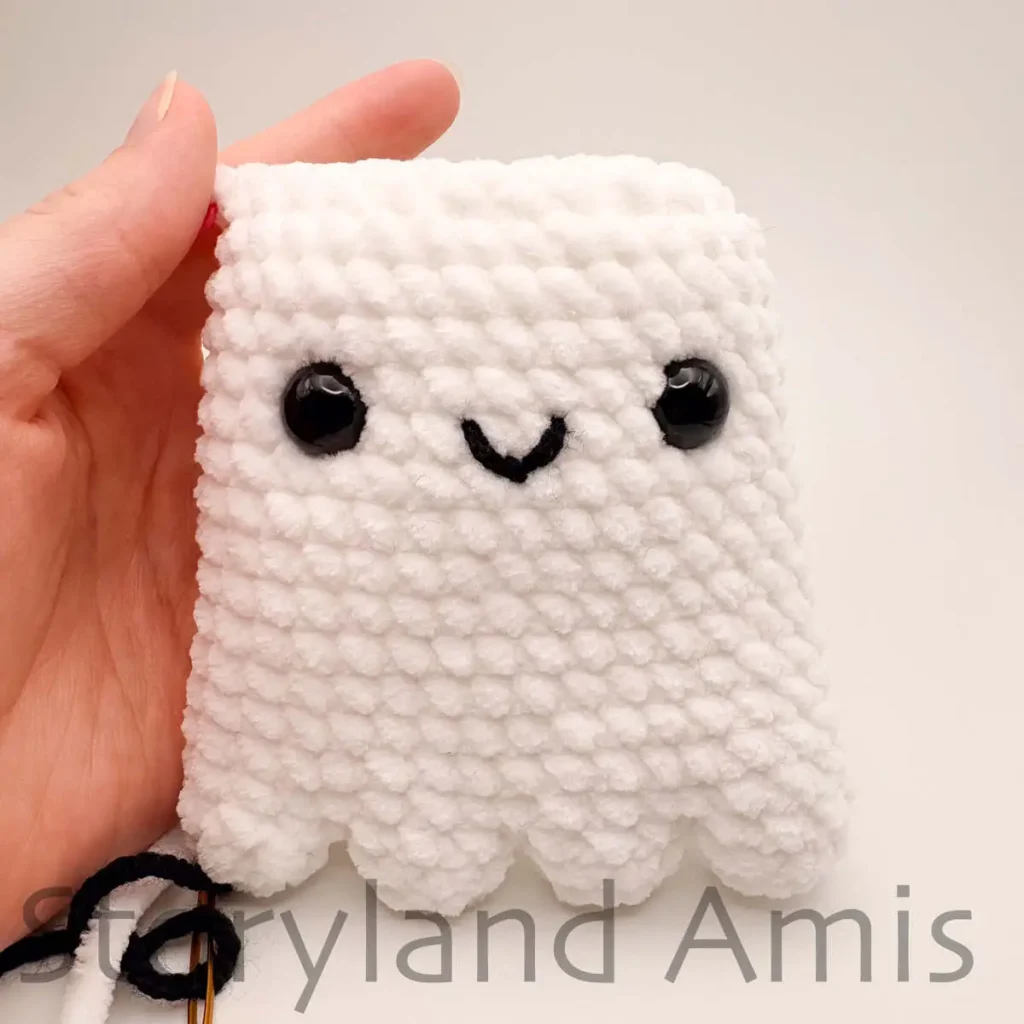
Start stuffing your ghost with fiberfill, continuing to stuff as you go. Don’t stuff him too firmly, as we want the body to maintain a somewhat flat shape. Use the back end of your crochet hook to stuff the scallops at the bottom of the body.
R19: sc in all 24 sts (24 sts)
R20: *sc 1, dec* rep 8 times (16 sts)
R21: *dec* rep 8 times (8 sts)
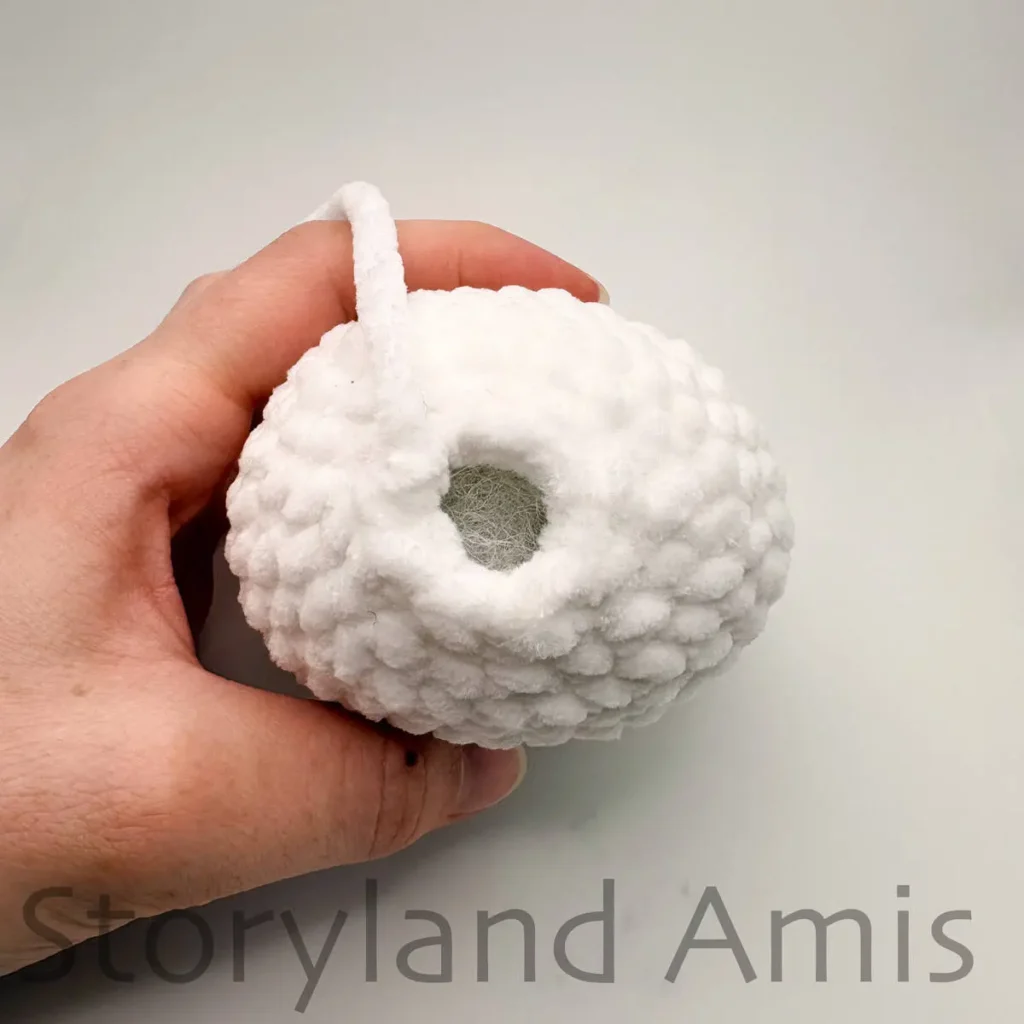
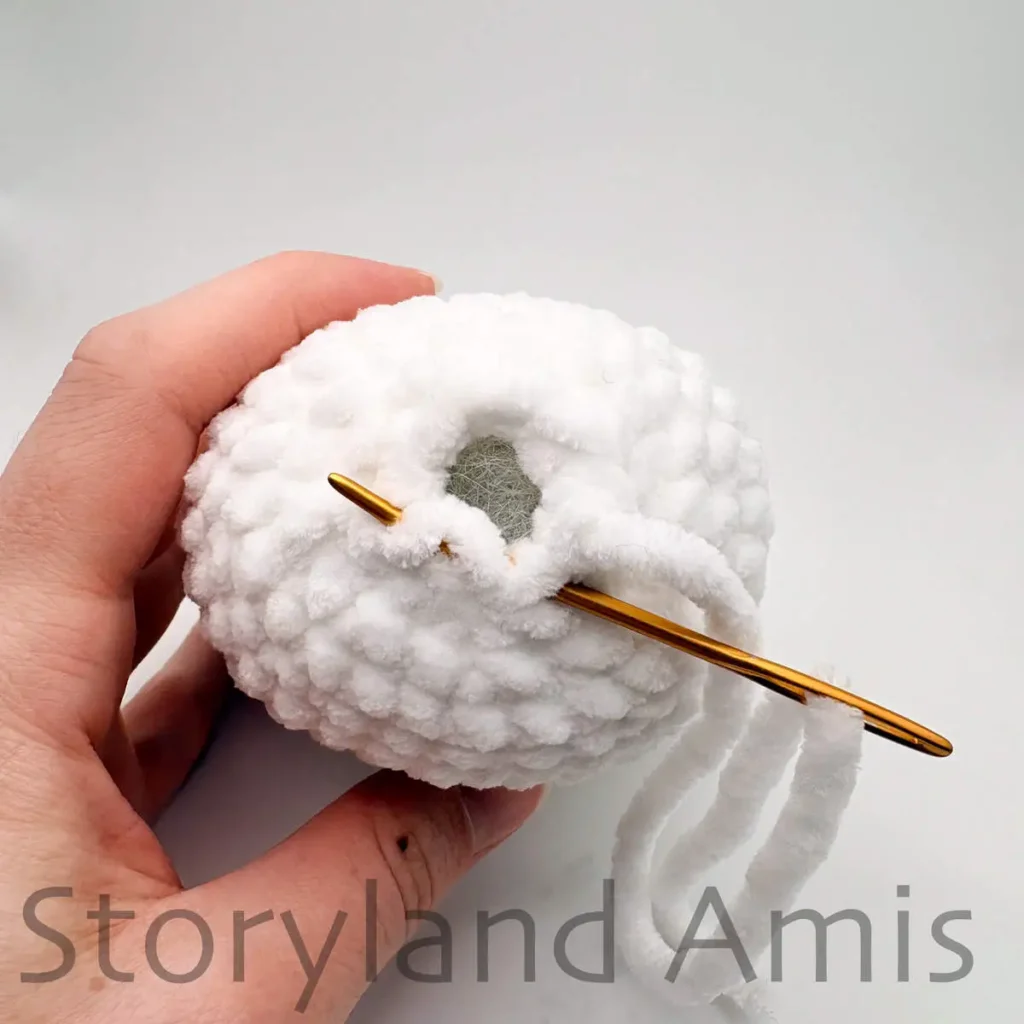
Finish off (see pic. #10) and neatly sew the hole closed using your tapestry needle by weaving your needle and yarn through the front loops of the last round and pulling it closed (see pic. #11). See how to do that here: https://www.youtube.com/shorts/OhP_aFneiUg

Get 24 patterns in this exclusive bundle!
For less than $15, you can get every Christmas pattern I’ve ever designed! Plus FREE access to any future Christmas designs for life.
Arms (Make 2 Using White Yarn)
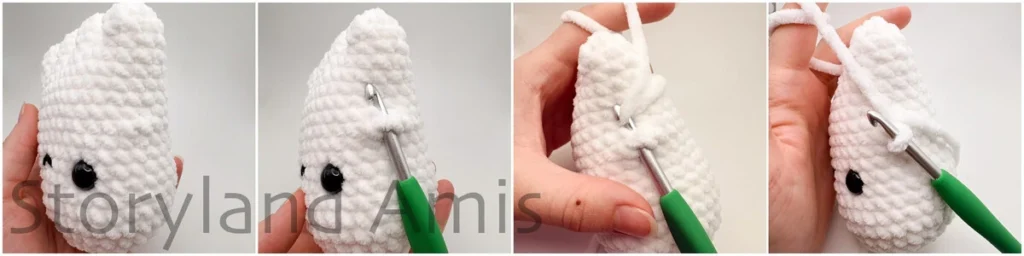
To make the arms, hold your ghost upside down and insert your crochet hook into R10 of the side of the body (see first 2 images in pic. #13). This is the round we marked earlier. Attach the yarn to the hook (see last 2 images in pic. #13) and make 5 ch sts (see first image in pic. #14), then make 2 sc sts in the 2nd ch from the hook (see second image in pic. #14), make 1 sl st in each of the 3 remaining ch sts (see third image in pic. #14)
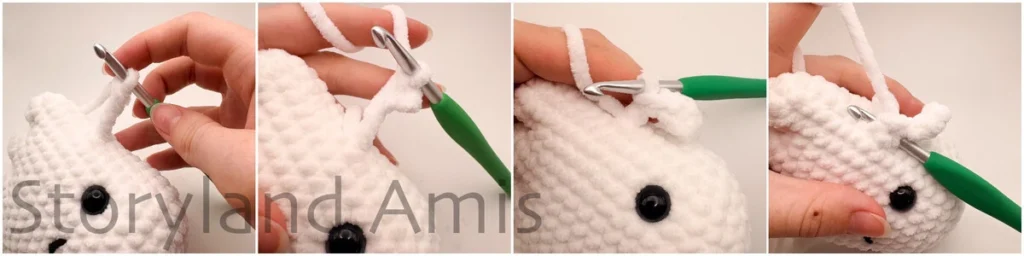
To finish off, make a sl st into R10 where we initially joined the yarn to the body (see last image in pic. #14). Cut the yarn, leaving a tail (see first image in pic. #15). Using your tapestry needle or hook, weave the tail over to the starting tail of the arm and tie them together (see last 2 images in pic. #15). Now weave the remaining tails into the body to hide them.
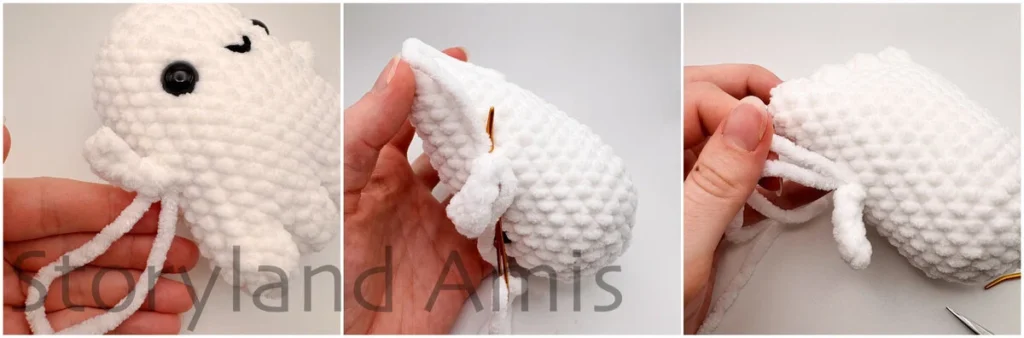
Repeat on the other side of the ghost for the second arm.
Your ghost is complete (see pic. #16)!
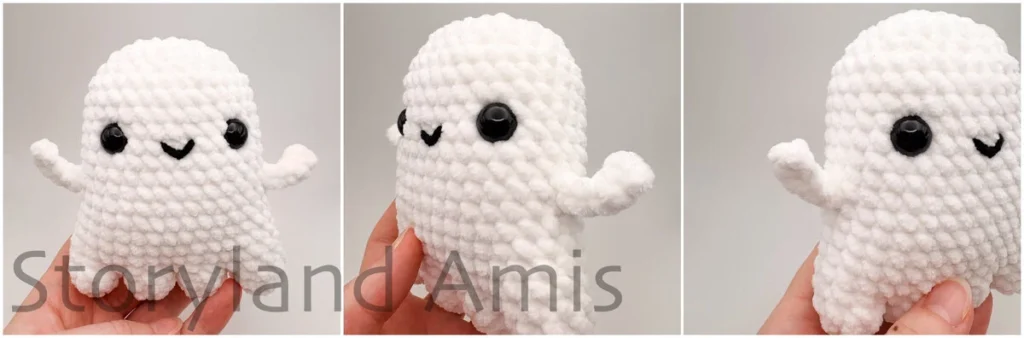
Congratulations—you’re done! I hope you enjoyed making this free no-sew ghost amigurumi pattern. I would love to see pictures of your finished project!
Please feel free to leave a comment down below with any questions or comments you have about this pattern. I always try to respond personally to all comments!
If you make this free no-sew ghost amigurumi pattern, share your creations with me via social media or email me directly! You can find me on Instagram (@storyland_amis) and Facebook (Storyland Amis).
Thanks for stopping by! Until next time, then – stay crafty!